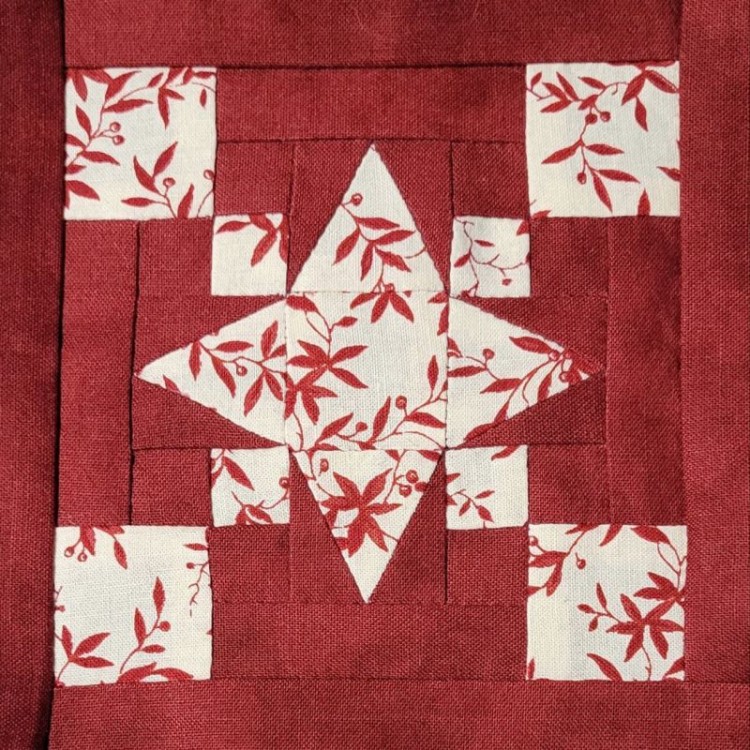
This post is going to get all technical, because this block had a whopping 37 pieces and no clear path to put it all together. It seemed like there ought to be at least one easy way to get from 37 pieces to one block.
I spent so much time analyzing this one, and it turns out there is just no way to handle it other than setting in those larger white corner blocks. Ugh.
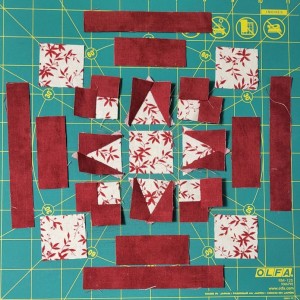
But first, you have to cut out the 37 pieces. Most of them were simple squares and rectangles, but it was less obvious to me how to cut the triangle pieces. I really hate messing with templates, so I was determined to cut these out with nothing but a rotary cutter and ruler.
The “side” triangles were actually fairly simple – the Dear Jane software just has you cut 2-1/4″ x 1-1/8″ rectangles, then cut each in half diagonally. The only tricky part is remembering to cut half of them top left to bottom right, and the other half top right to bottom left.
The center triangles were a little more complicated; the Dear Jane software gave weird angles that I wasn’t prepared to measure with the ruler I had. But it clearly specified that the triangle was 1-3/4″ tall, and 1-3/4″ across the base.
So, I cut a 1-3/4″ strip. Then I measured 1-3/4″ in from the left edge on the bottom of the strip and made a mark; and measured 7/8″ (half of 1-3/4″) in from the left edge on the top of the strip and made a mark. I cut between the two marks, then cut from the top (7/8″) mark to the bottom left corner of the strip, and I had my first triangle.
Then I measured 1-3/4″ in from the top left edge of the strip and made a mark. Cutting from that mark to the bottom left corner of the strip gave me my second triangle, and I continued on from there. No special tools needed.
Once the pieces were cut out, I needed to stitch them together. Here is the assembly plan I ended up with.
Step 1: Assemble the triangle pieces into little blocks, and the super tiny squares into L-shaped “blocks”, as shown in this photo:
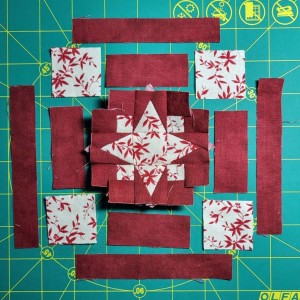
Step 2: Assemble the triangle blocks, L-shaped blocks, and center square into a nine-patch with missing corners:
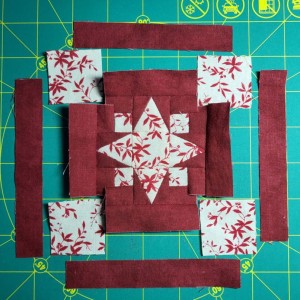
Step 3: Add red strips to the edges of the cornerless 9-patch:
Step 4: Set in the large white squares, as shown here:
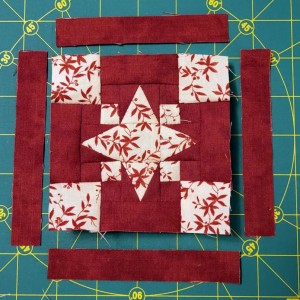
Step 5: Add the border strips to the edges of the block.
I got this block almost completely stitched in November, and just sewed on the strips around the perimeter in the first three days of December.
For the rainbow quilt, my original (best-laid) plan was to get the binding hand-stitched on to the back of the quilt in December, preferably in time for Christmas, but there was just so much perimeter on that quilt! As of December 31st, I was at the halfway point on the binding. It may become an Arbor Day present.
While my binding plan did go slightly awry, I’m glad my best-laid plans for this block went fairly smoothly.
Tricky one! But it came out looking great.
Thanks, Becca! I’m pretty pleased with the outcome. 🙂