I made such a great start on this block, getting it cut out and mostly assembled over the course of a couple of days off work. By the end of a week, I only had 5 seams left to finish up this block – and it was a block with a lot of seams (39 to be exact).
Then I went out of town, and I didn’t want to risk getting my expensive Gingher scissors confiscated by the TSA in order to do just five seams. So, the project stayed at home.
Once I got back, I caught a cold, I was busy at work, I was preparing for the holidays … and before I knew it, three weeks had gone by. I made a commitment this week to work on it for 15 minutes a day, and finally the block is complete.
This is a block that would have gone much faster with a sewing machine. Not just because sewing machines can stitch faster, but because you can do a different construction technique where you are sewing multiple seams at a time.
The technique in question is essentially sewing a strip of red fabric to a strip of green fabric, and then cutting that strip crosswise at regular intervals, so you end up with a bunch of single green squares sewn to a bunch of single red squares.
In practice, you could expand this technique to sew six strips of alternating red and green strips together. Then, when you made your crosswise cuts, you’d end up with strips of 6 alternating squares – each one an entire row of the block. Pretty neat!
However, this technique does not translate so well to hand sewing, because hand sewing doesn’t have two threads interlocking to form the stitches like a sewing machine has. So, the hand stitching doesn’t survive cuts through the stitched line nearly as well as machine stitching does.
In this particular block, the other problem with using that technique has to do with the fabric design itself. When you’re using this technique, the intervals you cut at may not really line up with the design on the fabric.
For example, if you’re using a fabric with penguins on it, and you start slicing your strips at one inch intervals to make your squares, you might get just a beak in one square, and a wing in the next square, and maybe part of a wing and a foot in another square … you get the idea.
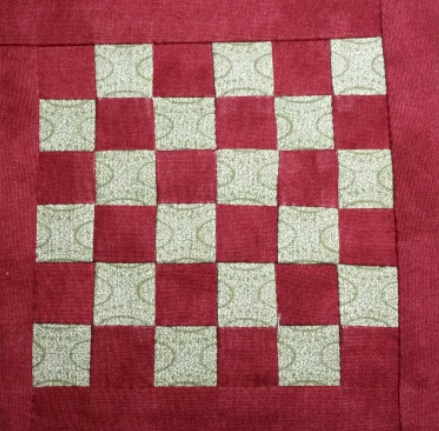
Since the blocks in this quilt are all so small, I’ve tried to be fairly careful with the scale of the fabrics used. In blocks with a few big pieces, I can maybe get away with a medium-scale print.
In this block, however, those little squares are just 5/8″ across … a.k.a. slightly smaller than the diameter of a dime. So, I needed to choose something pretty darn small in scale.
One of the smallest-scale fabrics Paulette had in that light green color is the one I used, which had what I thought were really small ovals printed on it.
Once I started to cut, however, I realized the ovals in the fabric were bigger than the squares. I was just going to get oval parts (a curve here, a curve there) in each block.
Enter fussy cutting (possibly my all-time favorite piece of quilting jargon). Basically, fussy cutting means you carefully cut out the shapes from the fabric in order to capture a specific part of the fabric design in your shape. For example, if you have a floral fabric, maybe you cut carefully to make sure that each square has one of the big purple flowers in the middle of it.
In this case, I fussy cut to use the oval shapes to my advantage. Since an entire oval wouldn’t fit in a square, I opted to use specific parts of the ovals instead.
I cut the fabric so that it had the edge of an oval at each side of the square. It almost looks like little handles sticking out of each side of the red squares. It makes me think of shopping bags.
Speaking of shopping bags … now that fussy cutting has saved the day and this block is finally done, I’d better get back to my holiday shopping!