Printing out the pattern pieces for these triangle blocks from the Dear Jane software is always an adventure. You have to remember to change the size setting before printing, because it defaults to making the triangles 4.5″ x 4.5″, same as the square blocks – why?!
Even if you manage to get the size right, some blocks are asymmetrical, so you have to remember to mirror the block when printing. This is because you’re printing on label paper, and the labels will be stuck to the back of the fabric, so all the pattern pieces need to be reversed.
And we’re not even getting into the challenge of putting the label paper facing the correct direction in the printer tray. For the record, it is label side down … I think.
Of course, I was scrambling to get out the door to retreat when I printed these pattern pieces out. I did manage to print them in the correct size and on the correct side of the paper, but I did not remember to mirror. When I started this block at retreat, I immediately realized my mistake.
Often the only part of the block that is asymmetrical is right at the tip, where two pieces overlap in one direction to make a “V” when they need to overlap in the other direction. This is an easy fix – just extend the one line and scribble out the other.
This block needed that quick fix at the tip, but I didn’t notice until I was already at retreat that there was another asymmetrical bit to deal with near the base of the triangle. I was stuck at retreat with no access to my computer or printer, plus those label sheets are expensive and I probably wouldn’t have wanted to waste one of them on reprinting this anyways.
So, I put my analytical skills to work and figured out how to fudge it so I could finish the block without having to use another sheet of label paper.
Essentially, I had to swap one triangle with a diagonal “slash” piece … but the slash needed to be a mirror image of the piece I had printed out. So, I cut out the slash shape, placed it upside down in an unused area of the label paper, and traced around it to create a mirror image label. I cut just inside my traced line, and I was ready to roll.
However, that meant I needed to assemble the pieces in a different order than dictated by the foundation piecing sections, which was a little nerve-wracking. There was some concern about whether the puzzle would come together in the end.
I ended up drawing a lot of diagrams to visualize how it should all go together. Naturally, I had forgotten to bring a pencil with me on that first day of retreat, but luckily my friend Barb was able to come to my rescue – she brings ALL the supplies to retreat!
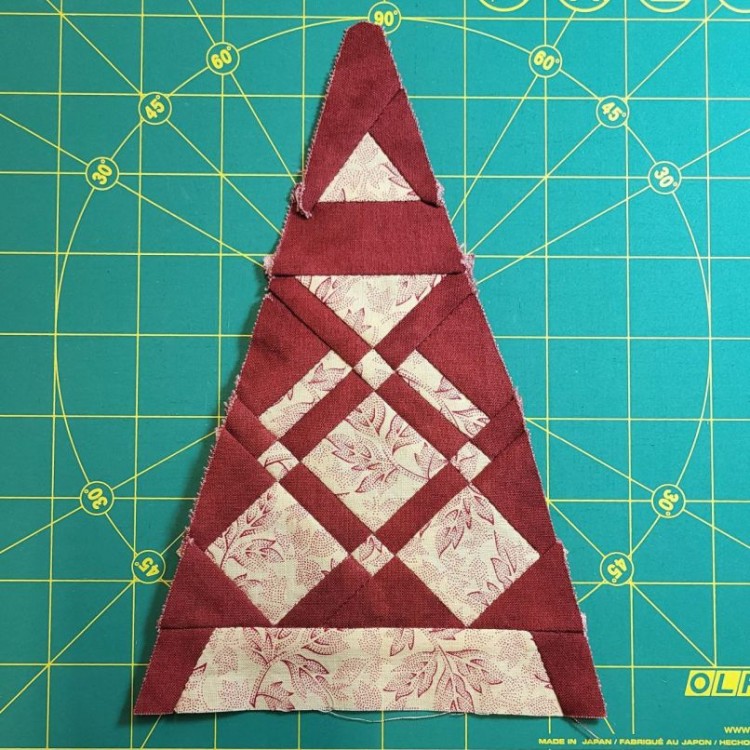
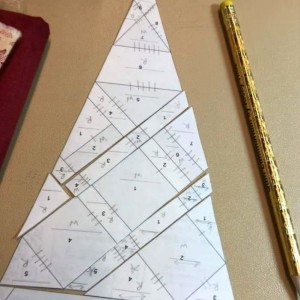
Here are my final marked-up pattern pieces after making the changes. Those two pieces at bottom center with the stars drawn on them are the two that I had to swap around:
I started assembling pieces into sections (not the same sections that the Dear Jane software calls for), then laid everything out and took a picture of it to try to visualize whether the pieces would all fit together properly. Somehow it is much easier to see these things in a photo than in real life:
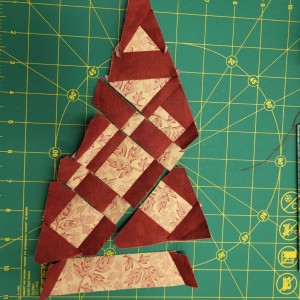
While it looks like some kind of cubist/surrealist art in the photo, the puzzle pieces did indeed all fit together in the end. On to the next block!
I was curious about Dear Jane software. Now the truth..so much to think about!
Izumi, the software definitely is helpful for printing out pattern pieces, auditioning different fabrics, etc. It’s just got a few quirks to keep in mind, especially where printing is concerned.
Also, I have the much older (2003, I think?) standalone version; the new version that plugs into Electric Quilt could be less quirky. 🙂