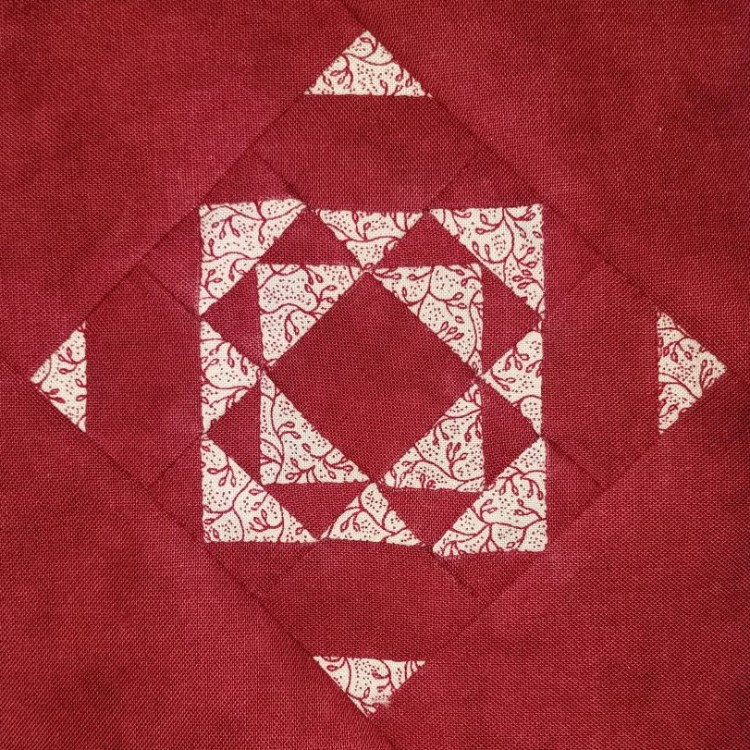
This is the last of my Versatile Nine Patch series of blocks, and definitely the most complicated. In theory, it is just a nine patch tilted 45 degrees to be a diamond, and then you add a big triangle on each side to turn it into a square.
In practice, it was pretty tough, just because the pieces were so tiny! I checked the software two or three times to confirm that this was only intermediate difficulty. It sure felt advanced to me.
The other thing that tripped me up on this block is that the software didn’t give rotary cutter directions to produce those red stripe pieces that run through the center of four of the blocks. Instead, I had to trace around a template to make those pieces.
Either I’m not a very good tracer, or the directions were a little off … or maybe my marking pencil just needed sharpening? In any case, those squares ended up quite a bit bigger than the others. I’d learned my lesson on previous blocks, and I knew to trim them to the correct size before continuing on. It was a little tricky to figure out exactly where to trim, though, so some of the lines are straighter than others in the end product.
Once I finally completed this torturous block with all its tiny triangles, I took to social media for the all-important external validation, posting this picture on Facebook with a penny for size reference:
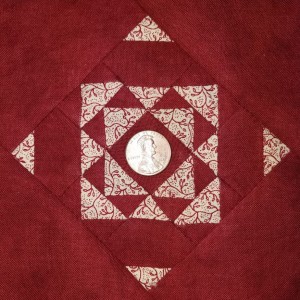
I think I surprised even myself when I took a good look at this photo and realized that the smallest red triangles are about half the size of a penny. Half a penny! No wonder this one was so difficult. Do you know how small a penny is? Have I mentioned that this block is only intermediate difficulty?
Social media came through for me yet again, confirming that triangles half the size of a penny were, indeed, quite small. This verdict gave me the boost I needed to move forward with the next block.
Sometimes I feel like it’s kind of shallow of me to share my quilt triumphs and defeats online, but I crave that connection with others who appreciate the work that goes into making a quilt. This is probably why I carry around a Ziploc bag with all my completed blocks in my purse (also, in case anyone spontaneously decides they want to admire my work).
Shallow or not, I love to hear from other quilters about my quilt projects or theirs, and I try not to be stingy with my admiration for their triumphs and their perseverance in defeat.
That’s just my four halfpennies (a.k.a. two cents) on the topic. On to the next block!
Not shallow at all! There is fellowship in sharing what you are making. Think about quilters of the past gathering together to stitch and share news and friendship.
Yes, fellowship is exactly the right word. I love that feeling of connection with other quilters, even ones I don’t know, even ones who have long since laid down their needles.
I am so glad, that your block turned out a bit uneven as well. I am paper piecing mine, using Susann Gatewoods templates. I sewed exactly on the lines, my 9 pieces fit together perfectly and the result is a heater skelter block with triangles not meeting where they should meet. I just don’t get it! So when I saw yours, I was reassured 🙂
Glad I could be of service, I guess? 🙂
Seriously though, no matter how accurately you sew, when you press the seam allowance to one side or the other, the seam itself shifts a tiny amount to one side or the other, because of the “bulk” of those two little bits of seam allowance on one side. That tiny shift is not so noticeable on a 12″ block … but it’s super noticeable on a 4.5″ block with ridiculously small pieces.
I’m not sure it’s even possible to sew the seams in such a way as to account for this shift; pressing the seams open would likely fix the problem, but pressed open seams are generally not as sturdy.
So, my advice would be to try finger pressing each seam to one side, then the other. Usually one direction will look closer to correct than the other, and that’s the direction you should press the seam with your iron.
Also, whenever my craft projects come out somewhat less than perfect (which is most of the time), I just tell people it’s folk art and it’s supposed to be that way. 😀