I’m trying out a new technique suggested by Linda C. in the Dear Jane Quilting Group on Facebook. When I struggled so much to get my first triangular block into a more triangular shape, I turned to the Dear Jane Quilting Group, and asked for ideas on how to get more accurate pieces, marked lines, and/or stitching on these triangles.
Linda recommended using Avery Labels as pattern pieces. Instead of printing out the pattern pieces on paper, cutting them out, tracing around them to mark a cutting line on the fabric, cutting out the fabric shape, marking a stitching line 1/4″ from the edge all the way around the piece … well, you get the idea. It’s a long process, with many steps where things could go wrong along the way.
In Linda’s method, you print out the pattern pieces without seam allowance on a full-page Avery label (the model number is 8665, for those that are interested in trying it out themselves). Then you cut out a pattern piece, peel off the paper backing, and stick the label directly on to the wrong side of your fabric. Cut out roughly 1/4″ around the outside of the pattern piece, and you’re ready to go.
Leaving the sticker in place gives you (in theory) a nice straight stitching line. Just line up and pin the two pieces of fabric together right along the label’s edge, then stitch along that edge.
In practice, I found it difficult to stitch right next to the line. Either I would end up trying to stitch through the label, or I’d get close enough to get some adhesive residue on my needle. In either situation, it made it tough to pull the needle through. My hands got a lot more sore than with ordinary stitching.
The other problem I had with the technique is that when I hand sew, I normally keep the needle fairly stationary with my right hand, and just wiggle the un-stitched portion of the fabric up and down onto the needle with my left hand. However, the two layers of label made the fabric pretty stiff, so it was difficult to wiggle it effectively. I ended up stitching one stitch at a time for most of this block, rather than wiggling 3-4 stitches on to my needle before pulling it through.
While I can’t deny that the stitching lines were more accurate than using my old method, I can’t say I’m totally in love with this new technique either. Early on, I decided that I was going to do half of the block with labels and half without, and let you guys decide if you could tell the difference. That’s why I have no pictures from the early part of the construction process.
Once I got several pieces stitched together using the new label method, however, I was seduced by how crisp the seams looked. I decided I didn’t want to have an uneven-looking block just for the sake of an informal survey, so I was going to use the same label technique throughout the whole block.
I’m a little worried that this one is going to make my other 58 finished blocks look bad though.
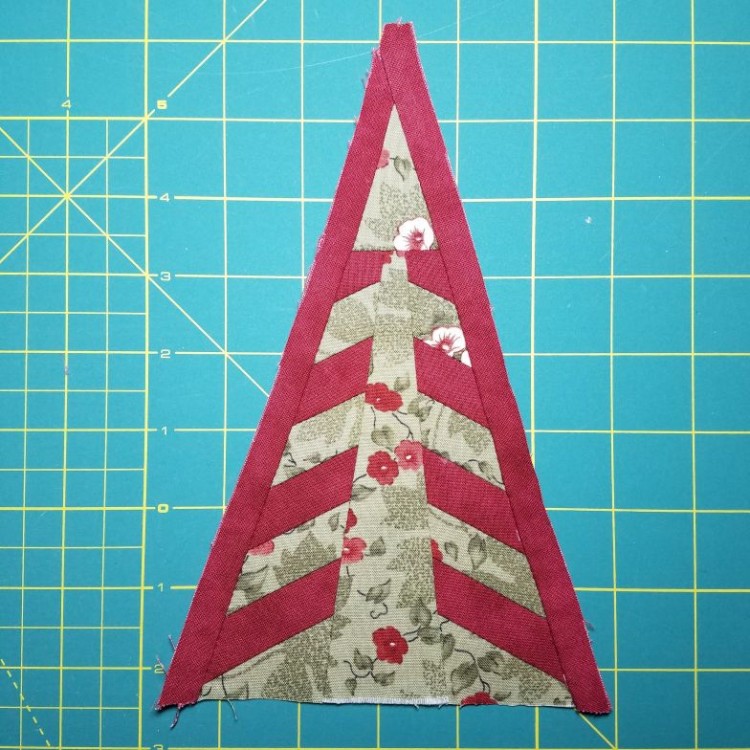
It turns out I was still destined to goof up somewhere. In this case, the fabric I used has about nine red flowers to every two white flowers, and once I got all the stripes sewn together, I realized I only had one green stripe that showed any white flowers. Not wanting that one stripe to look out of place, I made sure to include white flowers when cutting out the top of the triangle. The labels are somewhat transparent, making it ideal for fussy cutting.
The problem is that you’re sticking the labels on the back of the fabric, and my spatial reasoning skills were not up to the task. My intent was to have the white flowers over towards the left side of the triangle top, so they would balance out the only other white flowers, which were on the right side of the triangle. I got it backwards, and so my triangle still looks a little lopsided – this time, in terms of color/flower placement.
Fussy cutting fail aside, I was pleased with the accuracy of the seams. The triangle was still coming out slightly bigger than expected, but the seams were uniformly bigger, and not by very much.
The last step was to add those skinny red borders on the two long sides of the triangle, and having learned from previous experience, I cut those pieces a little big. Unfortunately, I was racing to get them cut before a school team banquet I was attending (plenty of downtime for hand sewing there!), and I ended up sticking the labels to the front of the fabric instead of the back.
Once I arrived at the banquet and realized my mistake, I peeled them off and stuck them to the back. The labels aren’t especially reusable, though, and the pieces were so narrow that I had a tough time getting them back on in the right place and then keeping them on while I stitched. This was definitely the hardest part of the block. I bet it would have been easier if I’d been paying attention and got the label placement right the first time.
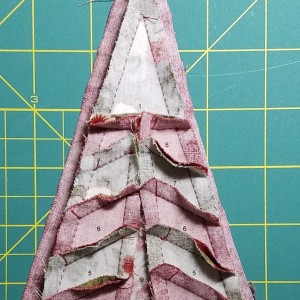
I couldn’t iron the completed block with the labels still in place, but those skinny borders really needed to be ironed into submission. I took a picture with the labels still in, just in case it looked terrible once the stickers were out. You can see all the pins I had to use to get the block to lie flat enough for the photo:
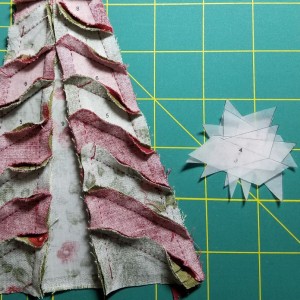
Anxious to see if it looked just as good without the stickers acting as stabilizers, I started pulling the labels off. This is much easier than with traditional paper piecing, because you’re not sewing over the labels – just next to them.
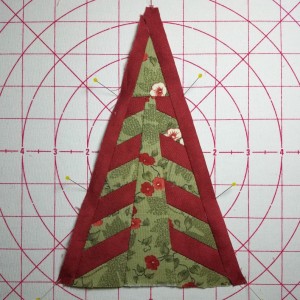
The labels came off quickly, and I was finally able to iron the block. The picture at the top of this article shows the triangle with the labels removed. I think it looks pretty darn good.
A full 24 hours after pulling all the stickers out, I realized I should have marked the seam allowances at the edge of the block with a pencil before removing the labels. I do still have to sew the block to something else at some point. There were definitely a lot of lessons learned on this block!
While this is not my favorite hand piecing technique, it’s a great one to have in my back pocket for odd-shaped blocks like this, where you can’t just measure as you go along and adjust the next seam if you were slightly off on the previous seam. And did I mention the crisp seams? This sticky solution is going to keep me right on track with the rest of the triangle blocks. I just hope the square blocks don’t get jealous.
Thanks so much for the post (and your suggestion from the Facebook group :)) I might give this a try.
McKenna
You are welcome! Even though it does make the needle a little sticky, this method really helps keep everything lined up properly in those pesky triangle blocks. 🙂
I read your blog and delight in all that hand piecing. An idea instead of Avery paper I use freezer paper sheets. (https://www.amazon.com/C-Jenkins-Industrial-Freezer-Sheets/dp/B000YZCUSQ/)
I print out the paper piecing patterns from susangatewood.net and cut the individual pieces apart and add my 1/4 seam and go from there. Just my method. I will follow you to the end!!! Happy sewing! 🙂
Yes! The freezer paper method is the exact same technique, but using Avery labels eliminates the step of ironing on the pattern pieces, for lazy people like me. 🙂