My first attempt at this triangular block started in late October, almost 3 months ago. It looked pretty easy (just diagonal stripes), so I thought I’d knock it out quickly before I went to my quilting retreat in early November. Then I could focus on getting a ton of square blocks done during the two days I was at retreat.
I printed out the pattern pieces from the Dear Jane software, dutifully traced them on to the fabric, and cut out the pieces. This took longer than expected. I think tracing and cutting out unusual shapes is my least favorite part of the quilting process – I’ll take a nice, easy-to-cut square any day of the week.
I was still sewing the pieces together when I arrived at retreat, and it just wasn’t looking the way I expected it to. My frustration level was pretty high, and it really affected my time at retreat (I’m sure my fellow retreat-goers didn’t appreciate my grumpiness either).
The triangle seemed much too small, and also the two border pieces I cut didn’t seem to be long enough to cover those two sides of the triangle. You can see I didn’t even attempt to stitch on those two border pieces:

After I got home, I realized what had gone wrong with this first attempt … or at least one of the things that had gone wrong. It turns out that by default, the software prints the triangular blocks to be the same size as the square blocks: 4.5″ x 4.5″. Of course, the actual triangles are supposed to be 5″ x 8″. There is a tiny box you have to check when you print out the pattern pieces, saying you want them to match the size of the block used in the quilt. You would think that would be the default setting.
So, attempt #1 was a total loss, and I moved on to beautifully-square blocks for several weeks to boost my confidence.
I was really discouraged with the whole triangle-making process, and at one point even considered redrafting all the triangle blocks to be square blocks that had designs similar to their triangle counterparts. I quickly realized that redrafting 52 blocks was not in the cards – that way lies madness – but I wasn’t sure what to do instead.
In late December, I started attempt #2 (still in its original triangular shape), carefully checking the box to make the pattern pieces the correct size. I’d gotten a new mechanical chalk pencil for Christmas, and I was optimistic that its super sharp point would help me trace the pieces with greater precision. Hopefully with more accurately-cut pieces, those two border pieces would be long enough this time.
So, I went into this attempt with very high hopes, and stitched the triangle pieces together fairly rapidly. When I went to sew on the two border pieces, however, they were once again too short.
I consulted my usual sources for advice on how to assemble this block, and every last one of them suggested foundation paper piecing. For those not in the know, foundation piecing is where you print out an outline drawing of the block on paper and then sew your pieces of fabric directly onto the printout, stitching right on the lines printed on the paper. When you’re done, you pull off the paper and trim the block down to size.
Foundation paper piecing can be great when you’re sewing on a sewing machine, but for hand-sewn seams, trimming the block down to size is a real challenge – you often end up cutting off the knots that you put at the ends of the seams to hold your thread in place. I found this out the hard way on another block where the pattern pieces were purposely drawn too big and you were supposed to trim the block down to size at the end. I still need to go back and resew all the seams on that one.
On the main Dear Jane website, I found an interesting article about one quilter’s approach to the triangles. Among other excellent tips, Tilde from Copenhagen suggested always cutting the border pieces a little longer than was called for, just as a rule of thumb. Similarly, she recommended that if the triangle block turned out too small, you just add on more strips of fabric to the sides or bottom until you get the block to the right size. She felt that this is what Jane Stickle (the original maker of this quilt pattern) had done on several blocks.
I wasn’t sure if I could amend my perfectionist ways, but I liked Tilde’s attitude and did my best to embrace it. At that point, I gave this blog article its current title and began writing it in my head. Thinking I was in the homestretch, I happily cut out new border strips that were 3/4″ longer than called for, and sewed them on to the block.
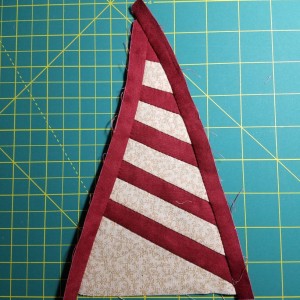
While the border pieces were now long enough, the resulting block wasn’t quite what I’d envisioned. It leaned noticeably to the left, like a sailboat sail on a breezy day:
My new attitude only covered blocks that were the wrong size, not blocks that were the wrong shape. What was I going to do? I turned to one of my favorite Dear Jane Facebook groups for advice, asking if anyone else in the group was hand-piecing the triangles. The response was overwhelming, and I came away with lots of new ideas for improving my tracing, cutting, and stitching accuracy.
My favorite idea was to use full-page Avery labels (where the entire sheet is one big label). You run the label sheet through your printer, printing out the outline drawing of the block on to the label. Then you cut out each of the block pieces printed on the label sheet, peeling and sticking them on to the fabric. When you stitch your fabric pieces together along the edges of the labels, you get a nice straight stitching line. Brilliant!
Unfortunately, this and many of the other solutions required me to purchase new supplies, and I was too impatient to wait for supplies. I needed closure on this block, and I needed it now.
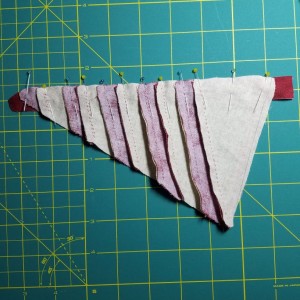
So, I printed out the outline drawing of the block on ordinary paper, cut out the pieces, and held each one up to my block to figure out where I went wrong.
There were a few seams where I was a little bit off on one end of the seam, making one side of the triangle taller than the other, which explained why it was leaning to one side.
Not wanting to waste more fabric by starting over for a third time, I decided to try and fix attempt #2. I picked out the seams on the border pieces and set them to the side. For each of those three seams that were a little bit off, I picked out the stitches, remarked the stitching line, and restitched them.
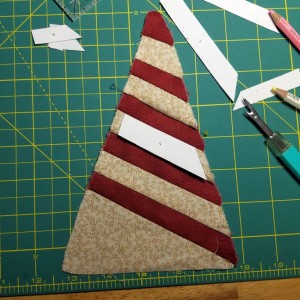
Now the triangle was no longer leaning to the side, but the original border pieces I’d cut out were still too short. So, remembering my earlier attitude adjustment, I used longer border pieces again. I drew a line marking where I expected the edge of the completed triangle to be, so I could make sure not to have my knot on the wrong side of that line. Then I could trim the borders down to size later without fear of cutting off the knot.
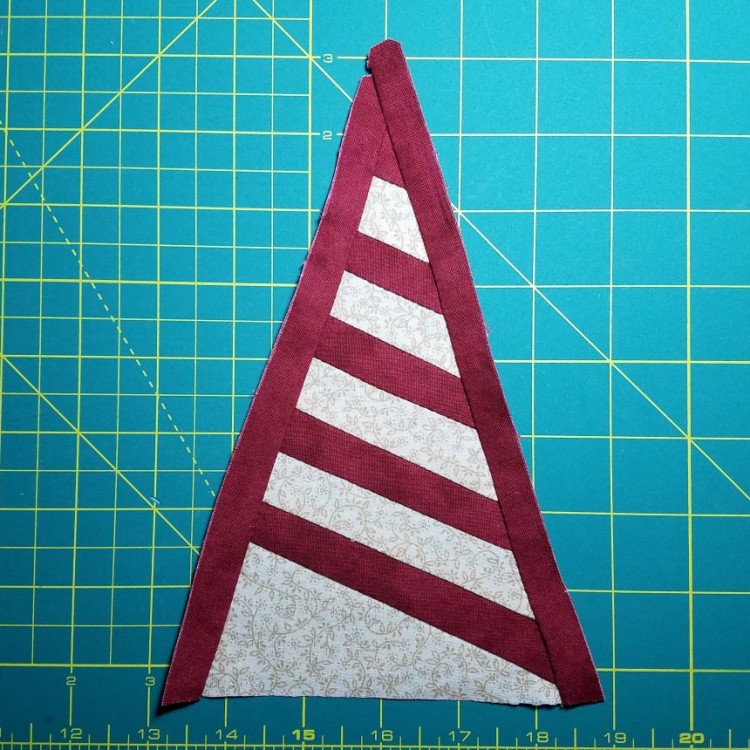
The finished result is far from perfect, but I think it falls under the category of good enough. I’m still on the fence about the triangle blocks though … the thought of making 51 more of them is daunting, to say the least. It may still turn out to be a quilt with a 13 x 13 grid of square blocks, and no triangular border at all. Another option is to just have solid triangles for all the border triangles. Then I’d get the right quilt size and look, but without all the aggravating triangle piecing.
I definitely want to try this new Avery label method on another triangular block though; if it goes well, maybe the triangles will be back in my good graces and I’ll be back on track with the original design. Only time will tell. Right now, it’s time for another nice, attitude-adjusting, reassuringly-square block.