
I’m trying to fit these triangle blocks in periodically, because I don’t enjoy making them, and I don’t want to end up at the end of the project with nothing left but triangles that I don’t want to sew.
For this triangle, I’m using the Avery label technique again. While the label adhesive makes the needle sticky and harder to push through the fabric, the technique pays off in very accurate and crisp seam lines.
This block had the extra complication of a couple of appliqué pieces at the top of the triangle. Since I couldn’t stitch the appliqué on through an Avery label, I had to wait to put the label on until after the appliqué was completed. So, I cut out the label with a 1/4″ seam allowance around it, kept the label backing on, and used it as a template, tracing around it to cut out the background piece that the appliqué would go on.
After the leaf and diamond pieces had been appliquéd on, I cut the added seam allowance off the Avery label and stuck it to the back of the background piece. The transparency of the label made it easy to center the appliqué pieces underneath the label, ensuring they would be centered on the finished product:
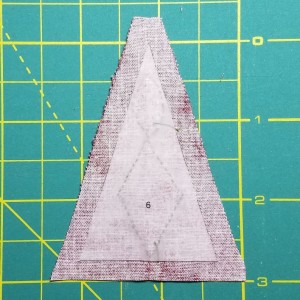
I had a fun time fussy cutting the little flowers to go in the center of each diamond in the block, including the appliquéd diamond. Again, the transparent labels made it easy to center the design in each diamond.
My hand quilting group helped me decide about flower placement in the big triangle at the base of the block. The design of the overall fabric isn’t particularly symmetrical, but I eventually decided to center one flower motif at the center of the large base triangle, and not worry that the two visible bluebird motifs are not symmetrically-placed. The partial flower motifs at the bottom will be hidden in the seam allowance.
One of the things I dislike about making these triangle blocks are that the component pieces are all kind of oddball shapes, and it’s hard to keep track of which pieces are which, as well as how they all fit together. On previous triangle blocks, I’ve cut out only one or two pieces at a time, and pinned them together immediately, so I’d know what went where. However, this really cuts down on the portability of the project, if you can only sew one or two seams on each outing.
So, this time I borrowed a technique from my dressmaking days, and used registration marks to help me keep track of what went where. Registration marks are those little notches and circles you see all over clothing pattern pieces, that help you line up the pieces properly as you sew them together. Making sure to match up these marks when you sew keeps you from making silly mistakes like sewing the sleeves on backwards.
I figured the same principle could be applied to these pattern pieces. You can see on the picture below that before cutting apart the different Avery label pieces, I drew lines across the borders between each piece:
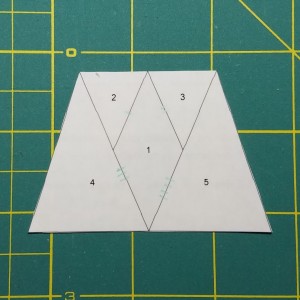
Then I could match up the lines when sewing the seams, to make sure I was not attaching any pieces upside down or sideways.
Notice also that I drew one line across one border, two lines across the next border, three lines across the third border, and four lines across the fourth. This way, I can use the registration marks not only to line up the pieces, but also make sure that I’m lining up the correct pieces next to each other.
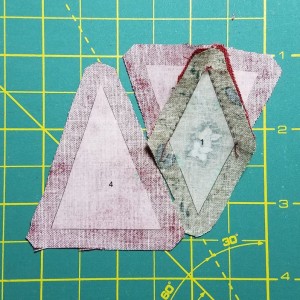
When it’s time to sew, I simply match up the sides of the two pieces that have the same number of marks on them. The photo below shows the three-line mark on the diamond lined up with the three-line mark on the large triangle:
With these registration marks, I felt more comfortable cutting out more pieces ahead of time. Not that it helped me get the block done any faster; I still procrastinated as much as I do on all the triangle blocks … but at least I was able to accomplish more per outing than on previous triangles.