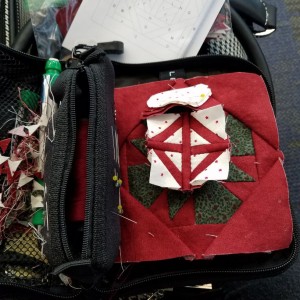
I started this block sitting in the waiting area at McCarran International Airport, thanks to thick fog in another city delaying my plane’s arrival. This is exactly why I always like to be prepared with tools and supplies for hand sewing, no matter where I am.
Some aspects of handwork are not ideal when on the go; for example, cutting out the pieces really needs to be done ahead of time. Drawing the stitching lines is more difficult without a table, but it can be done. Sometimes I use a book as a “table” in my lap for marking these lines, sometimes I use another ruler. I’m always on the lookout for a tool that would make this process easier.
Luckily, the cutting out was already done on this block, I had an extra ruler with me to use as a table, and the stitching itself is super easy to do in one’s lap. Plus, it turns out that airport waiting areas have excellent lighting for hand sewing. I made great progress during the two-hour flight delay (and it distracted me from the impending climb to 30,0000 feet):
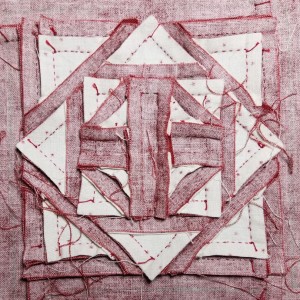
This block reminds me of a stained glass window (even more so in my colorway than in the traditional one, where the “lead” between the panes would be white or cream). All those little red strips are 1/4″ … coincidentally the exact same size as the seam allowance on each side of them. So, this block really suffered from a lack of space behind the scenes. There was so much seam allowance back there that didn’t have enough room to lie flat, that it just stuck straight out the back, making the block essentially 1/4″ thick during construction.
The finished product is a testament to my iron (a 20-year-old Rowenta that makes a weird jingling noise since I dropped it in 2000, but still works great). I did my best to tame the seam allowances on this block, but there are still some very bulky areas. It’s definitely going to be tough to quilt through all of that. Here is the back of the block during my taming efforts:
A friend sent me a few photos of Susan Paceley’s Dear Jane quilt, “With Liberty & Justice For All”, which took first place in its category at the local Quilt & Fiber Arts Festival earlier this year. One of the photos was a closeup of this exact block:
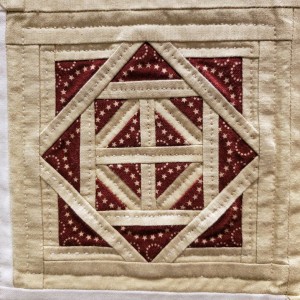
Susan Paceley had hand quilted her Dear Jane – something I’m planning to do (after I finish piecing all the blocks sometime in the year 2026), but I have been nervous about how to hand quilt through so ridiculously many layers of seam allowance. For this block, she stitched right down the center of each 1/4″ strip, which seems like a sensible approach. I’m just sad that I can’t see the backs of her blocks to see how she dealt with the seam allowances to accommodate her hand quilting.
I’m also jealous of how well-aligned her strips are … on mine the two sides of the center cross are slightly off. But in my quest to be less perfectionist, I’m leaving it alone. It turns out other people don’t notice those things (or at least they’re too polite to say so!).
The strips are very narrow, and were somewhat frustrating to work with. After wrestling with the center segment in the airport, I started attaching the strips to individual triangles as much as possible, building larger segments that could be attached to the center. For example, I “outlined” each of these triangles in red strips before attaching them to the rest of the block:
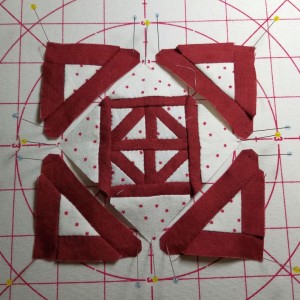
I’m not sure if it really made a difference in ease of construction, but it felt like it went more smoothly than trying to attach a thin strip, by itself, onto a larger piece with lots of seams.
All those tiny/narrow pieces definitely made for a challenging construction process. If each seam were just 1/32″ off, those discrepancies would really add up across the width of the block. I considered using the Avery label technique for greater accuracy, but I really dislike the stickiness that method produces, so instead I relied on marking accurate seam lines, stitching carefully, then measuring and readjusting often.
I think it came out surprisingly well, especially considering I marked most of my stitching lines while crouched in an airport waiting area, holding my makeshift ruler table in my left hand, using that thumb to hold the second ruler in place, and adjusting the seam allowance with the third ruler in my right hand:
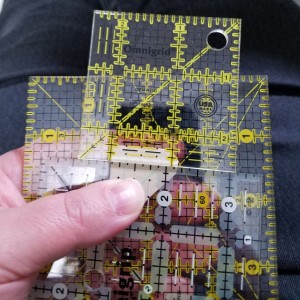
Yes, normally my right hand would be adjusting the tiny ruler at the top of the photo, but somebody had to operate the camera. Hopefully you can still get the idea. All those ruler lines are a little dizzying, but only the 1/4″ measurement on the tiny ruler matters in this process. The other two are just there to provide resistance to the pencil when you mark the line.
The technique is a little awkward, but it gets the job done. It’s all part of the challenge for an intrepid quilt traveler like myself.
Fascinating! And I love the idea of sewing in the waiting area.
I felt like it was a much better use of my time than sitting there and making myself even more nervous about flying. Sewing is definitely a good distraction!