I’m more than 3/4 of the way done with all the blocks, so this seemed like the perfect time to tackle the third corner. And what better block for tiny triangles month (aka July) than this one, which features the tiniest of triangles?
Note: This is not the new fabric I bought for a corner block. So, now you know that the new fabric is for the bottom right corner (since that’s the only corner I have left to do). But I will keep the fabric itself a secret in order to build suspense. I plan to do that block last, so you’ll just have to follow along until all the blocks are done.
The number of pieces in this corner block can only be described as ridiculous. If I counted correctly, there are 70 pieces, but there are so many pieces that I kept losing track while counting.
The trick is to just start in the middle and work your way out. I put together the tiny diamond-in-a-square block in the middle, then added some triangles and corner squares to make the innermost star shape.
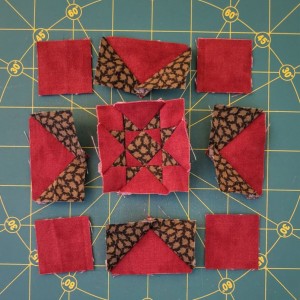
At this point, it already had 21 pieces and was still only 1 3/4″ square. Here it is, in all its tiny glory, with the pieces for the next round arranged around it:
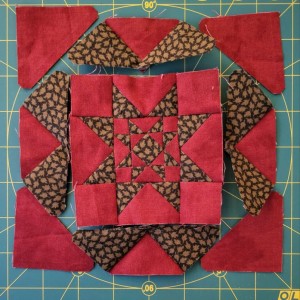
The next row was the same star shape only bigger. Now the count was 37 pieces in 3 5/8″ (pictured here with the next round of pieces around it):
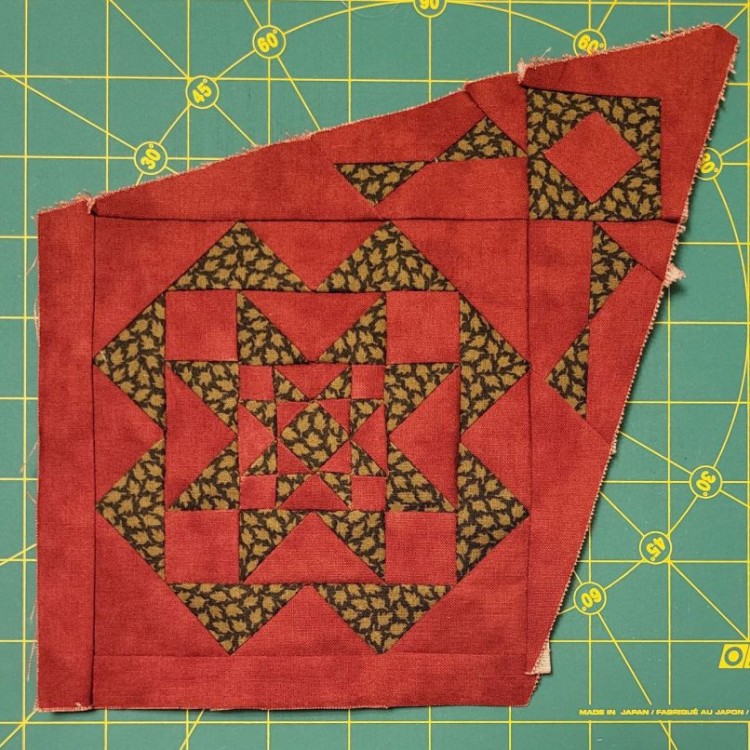
That last round of triangles brought the block up to the standard 4.5″ square (except no, I just measured and it was actually 5 1/4″) and 53 pieces.
But that was just the beginning, because the parts around the edges that turn it into a kite-shaped corner block add another 17 pieces. It was basically four blocks in one, and it chewed up most of the month of tiny triangles.
It not only had a lot of pieces, it had a lot of techniques. Traditional patchwork, paper piecing with Avery labels, appliqué, etc.
The first three “blocks” worth were done with traditional hand stitching, and I even cut out and put those two strips around the center square the old-fashioned way.
But when I measured that green square that’s in the point of the kite shape, so that I could cut it out and do the appliqué, I discovered that the green square wasn’t actually square. And I don’t mean that it was a rectangle either … those were not right angles in the corners of that shape.
I measured the shape in the Dear Jane book, and it was square there. I measured the shape in the Susan Gatewood pattern on line, and it was square there. So why wasn’t it square in the Dear Jane software’s pattern?
Further research led me to the upsetting realization that not all of the four corner blocks were even the same size in the Dear Jane software. What the heck is happening here? It’s madness!
But the end of the month was fast approaching, and I was determined to wrap this up, so I made an executive design decision. The one corner block that was smaller (top left) was already done and I wasn’t about to redo it, so I’d just deal with the inconsistently-sized corner blocks when the time came to assemble the edges of the quilt.
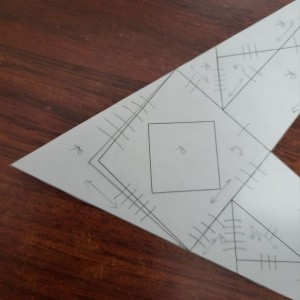
But I couldn’t let that non-square square go. So, I switched to Avery labels for the sides and point of the kite-shaped block. The Dear Jane software didn’t offer foundation piecing for any part of this block (probably because it was so weirdly drawn), so I just printed out the block outline on Avery label paper.
Then I redrew two sides of that non-square so it was actually square, before cutting out my label pieces:
I cut the green fabric square a little bigger, appliquéd the small red square, and then trimmed the green square down so that the red square was more-or-less centered (because, of course, it was no longer centered on the outline drawing once I redrew the edges of the non-square).
The rest of the pieces went together pretty quickly, which was a good thing, because I was down to the last day of the month.
At some point I will need to reckon with the differently-sized corner blocks, but I’ve got 44 other blocks to finish first, so for now, we will remain in suspense. Will everything fit together in the end?
If I keep up this pace, you’ve got less than two years to wait for the final corner fabric reveal, and hopefully the edges of the quilt can be assembled shortly after.
I finally decided to start my own DJ hand stitched so I can carry it along. It may will become a combination of hand stitched and machine but we shall see. I hope you leave your blog up for me to check back once in a while to see how you did a certain block! That quilt dot blogspot dot com is another great one to follow and I will use freezer paper to print out my shapes and cut without the seam allowances so I can trace a stitching line. I love following this journey with you and can’t wait to see the finished quilt! Happy sewing.
Thanks, Dawne! I plan to leave the site up indefinitely – I’m so pleased that someone else is getting value from my musings.
I also follow the That Quilt blog – it’s so helpful to see someone else’s approach to a particular block before I try to tackle it myself.