
Originally I had planned to make this triangle block in a fabric I’ve used elsewhere that has oval outlines on it.
But when I actually sat down to cut out the pieces, I couldn’t figure out a way to fussy cut it where I didn’t end up with a whole bunch of random curved lines where the ovals had been chopped up.
So, I went on a quest for other light green fabrics that I could use instead – ones that didn’t have problematic motif sizes. I came across this fabric that I’d used in my very first Dear Jane block.
It felt festive and a little (but not too) Christmasy, like a little forest of evergreens on the block. And the motifs on the fabric were small enough and random enough that I didn’t need to fussy cut, and they would not look too weird if they were chopped off at the edges of the pieces.
But there was a potential issue. A fat sixteenth (is this even a real thing? It was about the size of a piece of notebook paper) was all of this fabric I got with the donated Dear Jane supplies, and I had already cut one block out of it.
Once I laid out all the pattern pieces, though, I started to feel more confident that I would have enough fabric for the “forest” of triangular tree shapes.
So, I set to work cutting out the green pieces. Luckily, the print was not directional either, so I could alternate cutting right-side-up and upside-down triangles, interlocking them and minimizing waste around each piece.
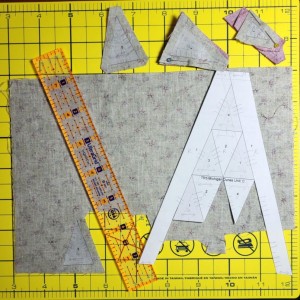
Notice the reappearance of the yellow cutting mat – it sure is handy when cutting out green fabrics!
Once the green fabric issue was resolved, the only real cutting concern was about those long red strips at the sides. Theoretically, you want to always have the straight of grain at the edges of a block, which is pretty simple with square blocks, but you’re doomed to disappointment on triangular blocks, where each of the sides is at a different angle.
I’ve been focusing on making sure the bottom (short) side of the triangle is on the straight of grain, and just letting the two long sides be at an odd angle to the grain.
But these long pieces on the edge had about 1/2″ that was actually on that straight-of-grain side of the triangle, and the rest of it was at an angle.
And cutting those pieces at an angle would have wasted much more of the precious red fabric than just cutting them as strips on the straight of grain. So, I opted to conserve red fabric.
With all the cutting decisions made and the cutting completed, the block went together pretty quickly, especially for a quilter who was back to work full-time at her day job after the holidays.
Since most of the block was the same piece, it was just a matter of sewing those triangles into rows, each row two triangles shorter than the last, then sewing the rows together. The last steps were to sew on the not-so-bias strips on the side, and then assemble and attach the little three-piece unit at the top of the triangle.
I’m pleased with the new green fabric choice and that I was able to get the most out of my limited fabric (both green and red). And I love the overall “forest of trees” effect of the block.