Finally!
So, my fabric was ready to go, and I had thread that was hopefully close enough in color. I was all set to quilt … and this time I really was all set to quilt.
The only question was which block was I going to do first.
The Dear Jane software rates each block in terms of difficulty level: beginner, intermediate, or advanced. There are plenty of beginner blocks (and even a few beginner triangles), but the general recommendation is to start with the easiest block in the quilt: a simple nine-patch block.
Side note: the blocks are referred to by a letter-number combination, with the letter referring to which row it is in (A-M, from top to bottom), and the number referring to which column it is in (1-13 from left to right). So, the nine-patch is block M10, in the bottom row and a few in from the right side.
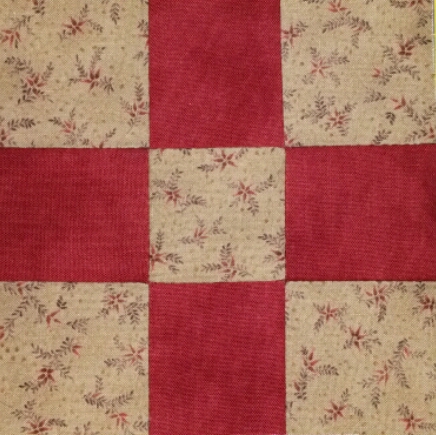
Another nifty feature of the Dear Jane software is that it provides information about what size of pieces to cut out for each block. I consulted the software and found that I needed 2 x 2 inch squares for the nine-patch block. Four of the red, and five of the alternate color.
I’d originally planned to make this block using some light green paisley from Paulette, but I decided at the last minute to use this scrap of fabric with tiny dark red flowers on it. I probably don’t have enough to do any additional blocks with it, but this makes the first block kind of special and unique.
The day my thread arrived, I cut out the fabric pieces as soon as I got home from work, marked the seam lines, and started sewing.
One of the areas where the software really falls short, in my opinion, is in the instructions for assembling the blocks. Luckily, the nine-patch is pretty simple. Sew the squares into three rows of three, then sew the three rows to each other. I’m a little nervous about the more complicated blocks though.
I finished the three rows that first night, but by then it was way past my bedtime, and I worried I’d start making silly mistakes.
So, the next morning, I packed my little travel quilting kit with the pieces, thread, needles, pins, scissors, and a ruler and marking pencil in case I needed to touch up my sewing lines.
I got my chance to quilt on the go while I waited at the dentist’s office that afternoon. It’s great to have project portability, but I wasn’t feeling so great about the seam I did while waiting for the dentist. Might have been the looming prospect of someone taking power tools to my teeth.
A couple of days later I finally went back and looked at the seam I’d sewn in the dentist’s office, and I think I’ve convinced myself it doesn’t look that bad. I’m trying not to be too perfectionist about this, or I’ll never make any progress. I’ll just keep ripping out seams and starting over.
I finally completed the block this evening, and I think it came out okay. Also, it feels really awesome to finally have something on the progress page.
Let’s all make a note of the date, so a decade from now when I’m working on the last block, I’ll remember when it all started. Now, on to the second block!