
Reverse appliqué seemed like the way to go on this block, but also felt like it would be awkward to do on such a small background piece … and yet forward appliquéing a pieced shape seemed even more problematic, so in reverse I went.
Reverse appliqué had another unique problem on this particular block. Usually when you are reverse appliquéing, the bottom piece is the same size as the top piece, so you can line everything up much more exactly. But placing the pieced diamond unit in just the right place on the back of the larger square promised to be tricky.
I stitched together the diamond units first. I pressed them, just so they would lie relatively flat while appliquéing them to the red squares.
Then I made a pattern piece to mark the stitching lines on the two red squares, by printing the block outline, and adding 1/4″ around each side of one of the squares that had the diamond on it.
Next, I marked the four spots on the pattern piece where the diamond seams should touch the background fabric, and cut out the center diamond shape from the paper pattern piece:
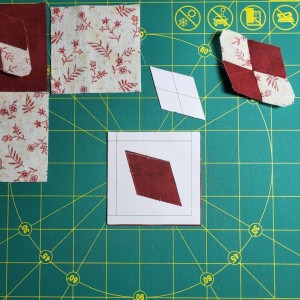
Then I placed the pattern piece over one of the red squares and traced around the inside (on the right side of the fabric), and made marks where the seams were on the red fabric. I cut out about 1/4″ (or a little less, just like when doing forward appliqué) on the inside of that marked diamond line.
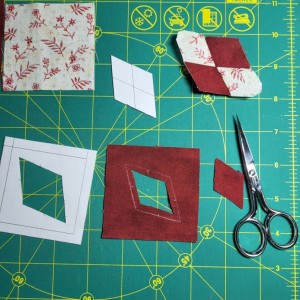
The final preparation step was clipping into the seam allowance at the points inside the diamond shape, then folding under the seam allowance on each side of the diamond.
Caution: It’s important to handle this background piece very carefully, since the hole that’s been cut out is not on the fabric grain and could stretch out of shape very easily.
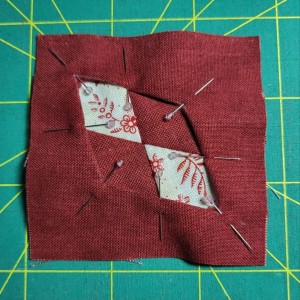
Once the background piece was prepped, it was time to put the two units together.
I placed the diamond unit behind this red square and very carefully pinned through both layers of the red fabric (the visible part and the seam allowance) right where one of the marks I made was. Then I continued pinning through to the seam of the diamond piece, approximately 1/4″ in from the edge of the diamond piece.
Then I repeated that pinning process for the other four seam intersections of the diamond piece, and finally, pinned in a similar way for the four points of the larger diamond.
It may not have matched up exactly with the diamond seam allowances at the points, but the goal here was to end up with a pinned piece that lies relatively flat and has four diamond shapes of approximately equal size:
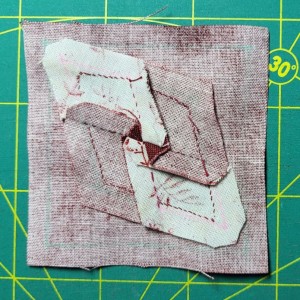
Once the two units were pinned in place, it was pretty much just regular reverse appliqué, although super awkward to hold with all those pins sticking out at crazy angles.
One thing to remember if you try this yourself is that as you get within 1/4″ of each of those seams, you need to flip to the back and push the seam allowance out of the way, so you’re not stitching through it when you are doing the appliqué.
You’ll see that the appliqué stitches don’t quite match up with the marked stitching lines on the back (or at least mine didn’t), but as long as it looks good on the front, maybe don’t sweat it.
The appliqué is by far the most difficult part of this block. Once it’s done, you’re just stitching together a simple four-patch block.
This one was definitely awkward to appliqué, but I think the finished product looks reasonable, even if the diamonds aren’t quite as pointy as intended.
I took an easy out and just appliquéd four light fabric diamonds onto the dark big square
I wish I had thought of that! But it’s done now. 🙂