After the challenge of the last block, I definitely needed a change of pace.
So, I opted to tackle a diamond in the square block. In my 18 years of quilting, I’d surprisingly never sewn a diamond in the square block before, but with only five pieces, I figured it would go together easily and give me a quick win.
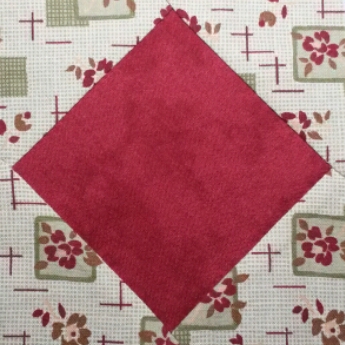
The fabric for this block is one of Paulette’s, and the choice surprised me. It looks more like a slightly drab 1930’s print than an 1860’s print. It almost has an Art Deco feel, with the stylized flowers and the rounded corners on the rectangles. It may not be an authentic Civil War style print, but I kind of like it anyways.
The block directions called for cutting two squares out of the green fabric, and cutting each of those squares on the diagonal to end up with four triangles.
Because the print was sort of directional, I needed to be careful about how I cut out the triangles. I didn’t want the print on any of the triangles to appear sideways compared to the others.
So, I cut one triangle from bottom right to top left, and used those two triangles for the top right and bottom left. Then I did the opposite with the other square, cutting from bottom left to top right, and putting those two triangles in the top left and bottom right. This way, all the triangles remain right side up – no rotating required.
Probably every one else knows the trick of cutting the diagonals like this, but I was pleased to have worked it out on my own.
The print in the top left triangle seems a little sparse though. Oh, well, it’d probably be boring to be perfect.
I didn’t find much in the way of sewing instructions, other than to do two opposite triangles, and then do the other two opposite triangles.
So, I sewed the top left and bottom right triangles on to the square, and then started to wonder how to proceed from there.
It seemed like I should be doing something to connect the triangles to each other where they met at the corners of the square, but I wasn’t sure exactly what to do.
I turned to Jinny Beyer’s book for insight, and the closest thing I found were guidelines for sewing flying geese blocks (rectangular blocks that look like half of this block, for you laypeople). She recommends sewing to the end of one triangle, and then bringing the thread through to the adjacent triangle and continuing on.
I’d already ruined that plan by sewing the opposite triangles on. So, I decided to just sew one stitch at the end of the already sewn-on triangle, then stitch through that to the new triangle and continue on. Then at the end of the new triangle, I stitched through to the already sewn-on triangle after that, took one stitch, and tied off the thread.
For most of this block, I was totally winging it. I’m not sure if I did anything right, but it seems like the block came out okay. As usual, the lopsidedness of the block in the photo is due to my camera skills (or lack thereof), not the actual shape of the block.
Now the question is whether to go for a quick win again with the next block, or to tackle another one of those frustrating striped nine-patches. I just can’t decide.