
I think this may be the most difficult block I’ve done yet. As I planned which fabrics to use for which blocks, I tried to match the scale of the fabric print to the scale of the pieces in the block. In this case, a small-scale print means a small-scale block, which means big difficulty. In fact, the other two blocks I plan to make from this fabric are also advanced difficulty blocks … I hope they won’t be even harder than this one!
For a tough block like this, I like to research a bit first and see how others have constructed it before I tackle it myself. In this case, many people chose to sew the octagons to each other, without the tiny red square and triangle shapes in between them. Then they just appliquéd the “lattice” of octagons on to a single piece of red fabric. I’m not a big fan of appliqué, so I opted to do this one the old-fashioned way instead.
In addition to not liking the appliqué process, I was concerned that it would use more precious red fabric (since there would be a layer of red fabric behind each of those green octagons). So, I did it my way and started cutting out all those little red triangles.
Halfway through cutting out the pieces, I started to think that my theory was misguided … there were so many tiny oddball pieces with my method, and each had to have 1/4″ seam allowance all the way around. On some of those tiny triangles, the seam allowance was far bigger than the visible part of the triangle. It’s possible I used more red fabric with this method than I would have with appliqué. At that point, however, I was committed to my approach.
Octagons have eight sides (in case you weren’t aware), which meant oodles of tiny cuts were needed to prepare the pieces for this block. My friend Colleen suggested I purchase a rotating cutting mat last year, and boy, was I glad I had it for this block:

It seems like an unnecessary extravagance (who is so lazy that they need a cutting mat that swivels?), but it really saved a lot of time being able to pivot the cutting mat and everything on it, rather then picking up ruler, template, and fabric, rotating them 45 degrees, and then lining them all back up again to make the next cut. Money well spent!
Even with the time-saving mat, the prep work for this block took far longer than the actual stitching. There were 29 pieces, many of them shapes with more than their fair share of sides, and the points on the triangles all had to be trimmed to reduce bulk, as usual. This time, however, I trimmed the corners of the center square shape too:
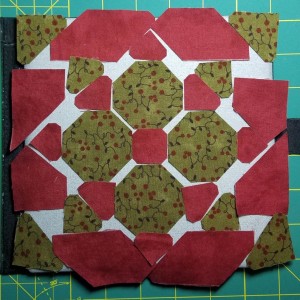
I’d never bothered with trimming the corners of a square before, but it really made a difference for this particular one. The angles of the square’s newly-trimmed corners line up perfectly with the angles of the octagon’s sides, making it much easier to get both pieces properly aligned to each other before stitching. In hindsight, I realize I should have trimmed the right-angle corners of those inset red triangles too, for the same reason. I’ll know for next time.
There were so many inset seams in this block, but luckily, they are much simpler to do when sewing by hand. My approach was to sew one octagon to the center square, then to the side of the adjacent octagon. Then, starting a new line of stitching, I’d sew the second octagon to the square and the side of the third octagon, and so on. Then I went back and inset all those red triangles around the edge, ending up with a diamond shape for the center of the block. That whole center section was an (at times futile) exercise in keeping everything out of the way of everything else while stitching.
Once that center diamond was done, the other pieces could be assembled into four corner triangles that were then attached to the diamond, like a simple diamond-in-a-square block. The only tricky part was making sure the little red triangles lined up with the little green triangles when sewing the corner units on to the center diamond.
I’m feeling pretty pleased with how the block came out, and pretty relieved that it’s done. I’m sure glad I had an easier snowball block as a warmup for this one … and this block is, itself, a warmup for the block I plan to do next. It’s finally time to tackle one of those four kite-shaped blocks in the corners of the quilt. After conquering the big difficulty of this block, I feel more than ready to face any challenge this Dear Jane quilt can throw at me.