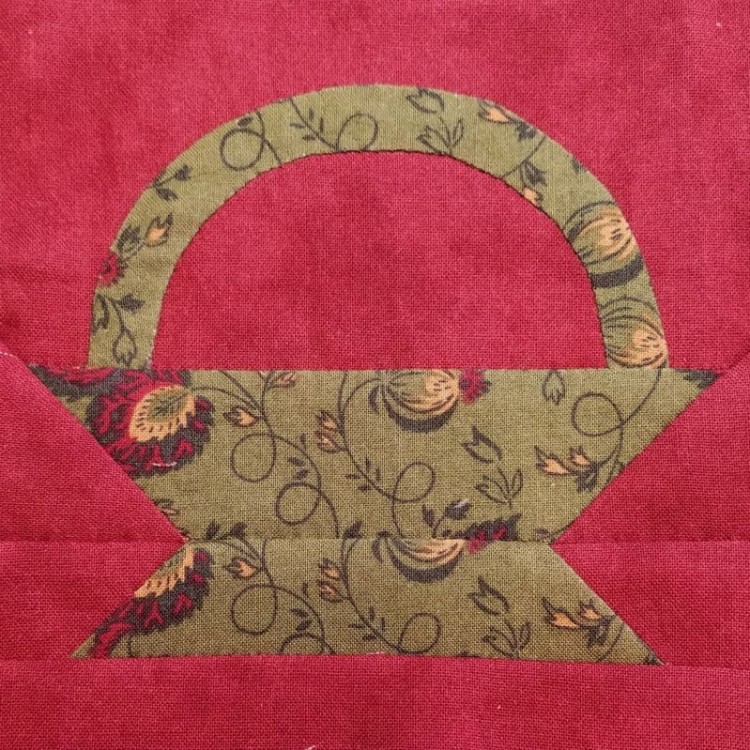
This basket block is unique in that it’s the only truly pictorial block in the quilt – none of the others have a clear right side up. In photos of the original quilt in the Dear Jane book, the basket is shown lying on its side. There is much controversy in the quilting world over the orientation of this poor basket.
Some Dear Jane makers handle the situation by rotating the block so the basket is upright. Some leave it on its side to remain true to the original quilt by Jane Stickle. Some give up all pretense of matching the original and put all the blocks in a different order. Luckily, I’ve got quite a few blocks ahead of me before I have to make this decision.
As many theories as there are on the orientation of this block, there are even more theories about how the basket handle should be constructed. I found suggestions on making it out of bias binding and even some complicated process using zip ties that I still don’t fully understand. Trying to bend a tiny bias strip around smoothly (with or without zip ties) sounded stressful and difficult, so I opted to just appliqué the old fashioned way, with a little bit of curved piecing technique thrown in.
First I printed out a full-size outline of the block, and poked a pin through the paper at strategic seam intersections. Then I laid the outline over the fabric and poked a marking pencil through the pinholes, to mark the exact placement of the handle. The basket may be oriented in an unexpected way, but that’s no reason to end up with the handle off-center too.
After cutting out the handle piece from green fabric, I cut the finished part of the handle pattern from the seam allowance part of the pattern. I used the finished part of the paper pattern to trace the stitching line on the handle piece, as shown below. This way, the marked line will be slightly outside of the finished line, and will not be visible when I turn under the seam allowance.
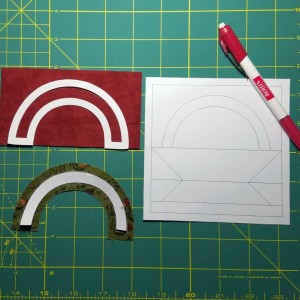
Similarly, I used the seam allowance part of the paper pattern (shown above) to trace the “stitching” line on the red background piece, providing a guide for placement of the handle. Since I’m using this part of the pattern and tracing inside, the marked line will be slightly inside the stitching line and will be covered by the handle piece. Now I don’t even have to erase any of my marking lines after sewing!
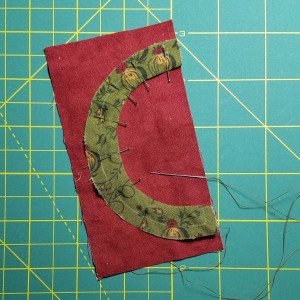
I appliquéd the inner curve (lower side of the handle) first, so I could still reach underneath and clip notches in that seam allowance. Just like when sewing curved seams, making these snips in the seam allowance helps the pieces to lie flat.
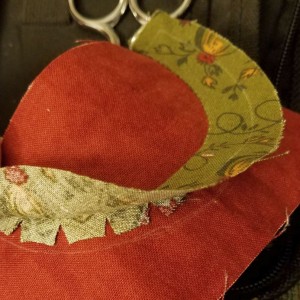
Once the inner curve of the handle was sewn and lying flat, I appliquéd the outside curve of the handle. The basket handle was definitely the complicated part of this block, and took me the better part of a week to complete.
Once that was done, the rest was pretty simple piecing, with the bottom of the basket done in two strips of green with red background sewn to each end at a diagonal. A strip of red background on the bottom completed the block. I got all of that done in the first morning at my quilting retreat.
I didn’t pay a lot of attention to fussy cutting on this block, and it shows. I’ve got two yellow flower buds at the right side of the handle, two red flowers at the left side and two yellow buds at the center of the basket bottom, and just plain green everywhere else. It seems like in my version of the block, there was even some question about the orientation of the fabric motifs. I’m just not enthusiastic enough about this block to redo it though.
In my mind, the block orientation is more interesting than anything else about this block. After much pondering during its construction, I’ve decided I’ll orient it relative to the other blocks in the same way Jane Stickle did, and then probably hang my quilt rotated 90 degrees, so the left side blocks are on top and the basket is right side up.