Lately I’ve been seeing a lot of Dear Jane quilts where the quilter had used more than two fabrics (one background and one flashy) per block. This is a concept I’m fascinated with, but also I feel like I’m pretty far down the road on my own Dear Jane journey to suddenly switch gears.
But I didn’t want to totally abandon the idea, so I thought I would use this wide-striped fabric to try to make each Pac Man look like it was made from a different fabric. Several years ago, I’d made a different Dear Jane block out of an actual cheater fabric. However, this time, instead of making a multi-patterned fabric look like one fabric, I would attempt to make a multi-patterned fabric look like many different fabrics.
Unfortunately, I had remembered this fabric having more different kinds of stripes instead of just two (the wider, yellowish floral one, and the narrower greenish one). So, I spent some time waffling about whether to even do this. I auditioned all my light green fabrics on the block, plus a new fabric that I got at retreat. None of them were right, and I needed to get a new block ready so I’d have something to do when I met with my hand quilting friends the next day. So I made do with the original striped fabric.
I’d also planned to angle the fabric so that the stripe of the fabric lined up with the tops and bottoms of the Pac Man mouths, but that would leave me with bias edges on the bottom of the block, which I didn’t really want. So, I went with horizontal stripes and just tried to be careful about how I fussy cut, especially where two of the light green pieces overlapped.
To top everything off, I’d printed out the pattern pieces while racing to get to retreat and didn’t mirror them, just like with Triangle BR11. But a month later when I actually got around to doing the block, I didn’t want to waste the label sheet, so I extended some lines and chopped off others on the pattern pieces before cutting things out.
I would have liked to stick the pattern pieces on the front of the fabric (in which case it would be fine to use them un-mirrored), because fussy cutting was so critical to the success of my plan. But I couldn’t figure out a good way to sew the pieces together with the pattern pieces tucked inside the fabric pieces … how would I know if I was sewing along the lines? So, I drew on the additions and subtractions to the handful of affected pattern pieces and prepared to use them on the back of the fabric.
But the pattern woes didn’t stop there. I usually print out the foundation piecing patterns on the label paper, so the pieces are grouped together on the sheet and I can draw little registration marks across the “seam” between two pieces. This allows me to line up the pieces properly when I’m stitching.
In this case, because of the curved seams, there was no foundation piecing pattern. And for some reason I printed out the template patterns with seam allowances. Maybe because I thought it would be difficult to eyeball the 1/4″ seam allowance on curved seams? But the downside is that each piece was on its own, with no good way to make the registration marks.
In hindsight, I should have just printed the block outline on the label paper. This would have allowed me to make registration marks, and it would have made it much easier to redraft the pattern pieces where they were not mirrored. Sure, I would have lost the printed seam allowances … but I ended up just eyeballing the seam allowances anyways. Live and learn, I guess.
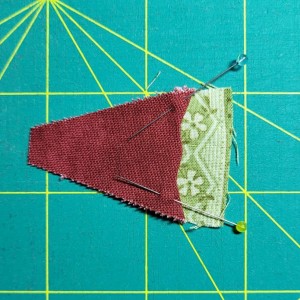
After all the drama of the pattern pieces, the actual block construction was a bit anti-climactic. Curved piecing is not my fave, and it’s kind of awkward to do with stiff labels attached to the fabric pieces.
But those label pieces helped me be a lot more accurate than I might otherwise have been … turns out I’m not that good at eyeballing 1/4″ seam allowances on curved pieces. It was nice to have the edge of the label as an accurate guide for pinning and stitching.
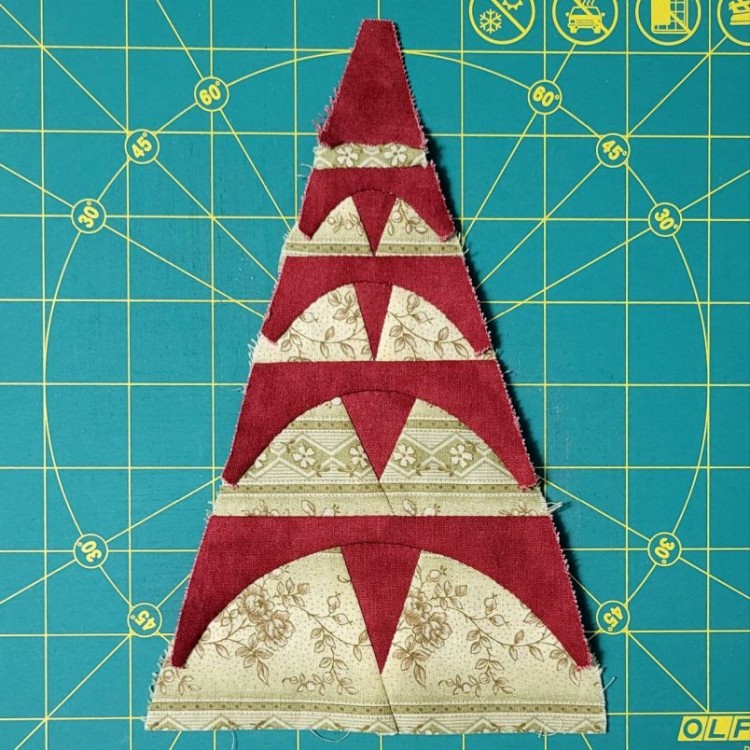
I started with the biggest curve at the bottom and worked my way through smaller and smaller curves. The next to last one was a bear to stitch. I was dreading that tiny camelback piece at the tip of the triangle. I put it off for weeks, but we were getting to the end of June (I’d started the block in mid-May), and I needed to do something. So, I vowed that I was going to complete it that day.
Then I read several chapters of my book. Then I played a game on my phone. Then I did housework. Then I logged in to work (on a Saturday!), all to avoid working on this block.
Finally, I got down to it, but I just could not get the curves pinned. I threw it down in frustration and procrastinated by working on a different quilt project.
The couple of hours away from it helped, and I decided I was going to throw in the towel on curved piecing and just appliqué that last little bit:
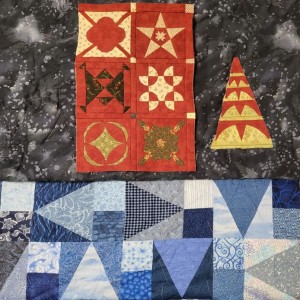
It’s not pretty, by any means, but it is done. I think this might be my longest-running block – 5 weeks from start to finish. It didn’t leave a lot of time for anything else, so I just skated by on my UFO Challenge goals for June, finishing the bare minimum of one Dear Jane block, two blocks sashed together (shown here attached to four already-sashed blocks), and 18 triangle motifs on the rainbow quilt:
Cheater fabrics are supposed to save the quilter time, but I feel like trying to use this striped fabric as a cheater fabric somehow made the block take even longer to complete. I’m relieved to have this one done!