
This started out as a simple task of sashing four blocks together, but then those four could be attached to four other groups of four to form a larger segment (J5-M9).
But the fun didn’t stop there, because there were more segments that could be attached.
I debated extensively with myself about whether to stitch this segment to the bottom-right corner segment (J10-M13), and then attach that to the even larger segment I’d already assembled (A5-I13), or wait to attach it till later.
The main point of contention was the dreaded super-skinny sashing between the main body of the quilt and the triangle border. I’m not looking forward to it at all, so I am always trying to figure out a way to make it easier to do.
And by easier to do, I mean attaching the super-skinny sashing to the smallest segment possible, so I’m not trying to attach a tiny strip of fabric to a super heavy most-of-a-quilt-top.
I’d hoped that I would be able to attach the super-skinny sashing to the more manageably-sized triangle borders first, but that’s not the way it’s set up. The sashing strips have to be attached to the completed center of the quilt first.
And the way the skinny sashing overlaps, you have to sew on the top and bottom sashing before you add the sashing at the sides. If I’d noticed that, I may have made different choices about which blocks to complete first.
But that ship has sailed. By the time I get the lower-left segment done, I’ll be almost done with the whole body of the quilt anyways.
Since waiting to assemble the right half (technically, the right 2/3) of the quilt body didn’t buy me anything, I figured I might as well spend three and a half weeks stitching all those segments together, so I could at least show off a big chunk of the quilt top at my fall quilting retreat.
And that’s what I did. Here it is, proudly displayed on a design wall at retreat:
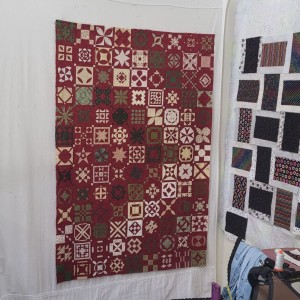
It looks like a real quilt (well, a real 2/3 quilt) once it has been hung on a design wall, doesn’t it?
I’m still toying with the idea of making tiny cornerstones on those super-skinny sashing strips between the main body and the triangle borders, so that I can get away with attaching the sashing at the sides before the top and bottom. Something to ponder while I slog through all the rest of the sashing.
It’s even more beautiful in person.
Awwww, thanks Kathleen! I was so excited to finally show it to you guys. <3
I can still feel the excitement from that day! What a thrill to see so much assembled. The triangles are going to be icing on the cake!
Right?! It feels so much more real once you see it up there on the design wall. And once you have witnesses! 😀