I thought that the “homemade stripes” in this block (sewing together narrow strips in alternating colors) made it the perfect block to do right now. I’m psyching myself up for my first triangle block, and I’ve chosen the easiest-looking one to do first (a triangle made of thin strips sewn together in alternating colors). I figure constructing this block will give me some good practice at sewing together thin strips before I tackle the triangle.
This block is sort of a log cabin pattern turned inside out, and I’ve made a log cabin quilt before (pictured below), so this felt like familiar territory.
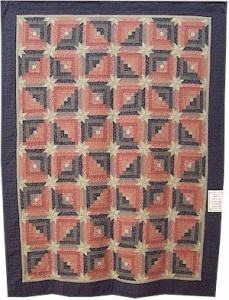
For traditional log cabin blocks like the ones in the photo above, you start with a center square, and sew rectangles (logs) around each side in turn until you reach the desired block size.
For the inside-out log cabin effect on this block, you make four log cabin “triangles” instead of squares, starting with a center triangle and adding logs on the two short sides of the triangle. Then you stitch the triangles together into a square, using thin strips in between them to form a big X.
Here’s my block in progress:
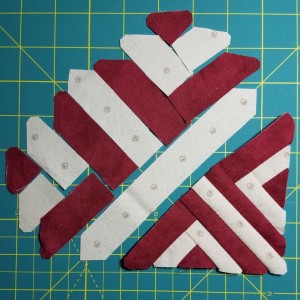
You can see I’ve sewn together two of the triangles with a thin strip in between them (kind of looks like a butterfly!). All the pieces for the other two triangles and the center strips are laid out above the completed triangles. It sure takes up a lot less space once everything is stitched together.
The official pattern for this block called for a traditional log cabin style of construction, where one rectangle overlaps the other at the triangle “point”, and you can see that’s what I did on my block.
Jane (the maker of the original quilt) used a striped fabric, so she actually mitered her corners. For the uninitiated, mitered corners are where you have two pieces meet at right angles, and you slice each of them on a 45 degree angle, so the seam between the two pieces is perfectly centered … instead of off to one side like my seams are in this block. Think of how the corners on a wooden picture frame look – that is a mitered corner.
I’m sure Jane decided to do this because she wanted the stripes in her striped fabric to come together and line up around those triangle points, but for the fabric I chose, this wasn’t really necessary.
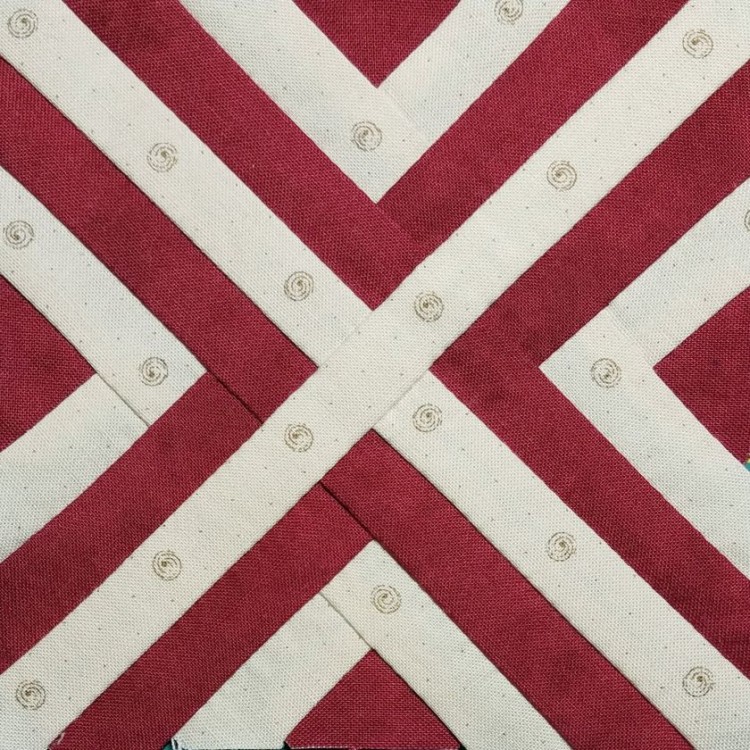
I’ve been doing my best to pick fabrics that make sense in scale and pattern for the block design. I’d chosen this fabric early on because it was a smaller print that wouldn’t look all choppy on these half-inch wide strips. Happily, the little brown swirl designs on the fabric were perfectly spaced and just the right size to fit within each stripe. Now it looks almost like buttons or rivets going down each stripe. I’m really pleased with the effect.
Since I’d already had a lot of practice at log cabin blocks (there’s 48 of them in that quilt I made), I’d expected this block to go together pretty quickly. I even had some appointments/events scheduled where I could work on the block on the go.
What I hadn’t factored in is how many pieces there are in this block that look an awful lot like a whole bunch of other pieces in this block. It was really tough to travel anywhere with this one, because I didn’t want to get mixed up about which pieces went where.
So, it mostly remained laid out on my worktable at home, with a big square ruler set on top to keep the pieces from shifting out of place. After a particularly intense sneeze that blew all my carefully arranged pieces off the table, I’ve learned my lesson about this. Always keep your pieces weighted down.
Once I finally set aside some time to focus on it, the block went together easily. Fresh off this homemade stripes success, I think I’m ready to tackle my first triangle. Stay tuned for that gripping saga!
You really do beautiful work! And I appreciate your descriptions of the techniques used and comments about the fabric choices for each block. A good learning tool for us novice quilters!
Thanks! I really appreciate being able to look at other people’s blogs for tips and techniques as I make this quilt … so I’m trying to pay it forward. 🙂
Just found your blog, and I’m catching up! Suggestion; you can stick pieces to a cheap piece of felt and roll it up to make a portable travel size design wall to keep little pieces organized for your blocks. Love your blog! Wonderful undertaking you have embraced!
Thanks, Beth, I’m so glad you’re enjoying my blog. 🙂
And what a great tip about using felt for a block-sized design wall. I’m going to try this out!