
The blog entry for my last block was all about color placement changing the look of the block. This one’s all about changing the construction technique without changing the look of the block.
For this block, most choose to appliqué the diamonds on to the background fabric, but there are many different ways to construct the block.
It appears that in the original quilt, Jane opted not to appliqué, instead sewing two pieces of background fabric around each diamond (you can tell because she used striped fabric and some of the stripes went in different directions). This technique intrigued me, but I opted not to try it for two reasons.
First, the pattern in the Dear Jane software called for appliquéing the diamonds, so I would have had to draft my own pattern, and I am far too lazy for that.
Second, I’d promised my fellow Dear Jane enthusiast Cynthia to show off my technique for achieving crisp points when appliquéing diamonds, so I felt kind of locked in to using appliqué.
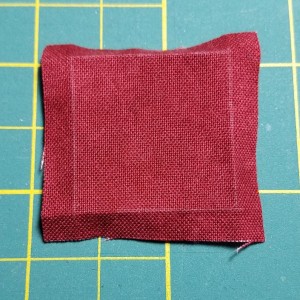
I did opt to change the technique for the center square though. In the original, it is made up of four small triangles, sewn on to the corners of the four squares that have the diamonds on them. When the four squares are sewn to each other, the triangles come together to form the center square.
This all seemed like a lot of unnecessary seams (and their accompanying bulk). I’m no stranger to eliminating unnecessary seams. So, I opted to use one large square of the background fabric, and five appliquéd shapes (four diamonds and a small square).
I cut out the pieces, but before I started the appliqué, I found a new technique for crisp points in an old issue of Australian Patchwork & Quilting Magazine.
So, I’m going to share with you two methods for crisp diamond points, and you can decide which you prefer.
With both techniques, I start with drawing the stitching lines on the right side of the fabric using a chalk pencil. Then I fold under on the stitching line and press it with my fingers:
With the center square, I used the new magazine technique. It is similar to the mitered corners that you might have done when binding the edges of your quilts.
The first step is to fold down the point of the square, like this:
Note: I’m just using the chalk pencil to hold down the point in the photo – you don’t have to mark anything on that turned down corner.
Next, I fold over the finger-pressed seams on either side of the folded-down point. The two sides should meet on top of the folded-down point, like this:
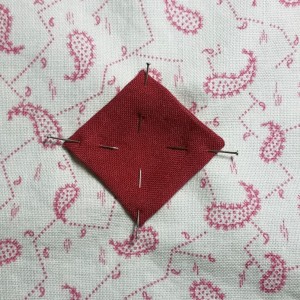
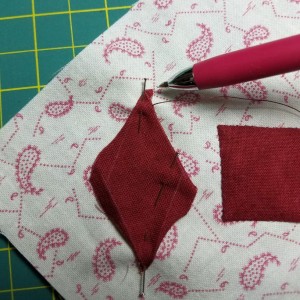
Put a pin in the point to hold it in place, then repeat on the other corners. Once all four corners are folded and pinned, place the square on the background fabric and adjust the pins so they go through the background fabric too:
I usually start stitching about half an inch before one of the points. When I get to the point, I take one tiny stitch right at the point (this is sort of like a back stitch, helping to hold everything in place at the point). Then I start down the next side and repeat the process for the other three corners.
This is the first time I had used this “mitered corners” technique for appliqué, and I must say I’m a fan of it for squares. The folding technique means there are no raw edges that can peek out near the points, and the fabric is fairly evenly distributed underneath each point.
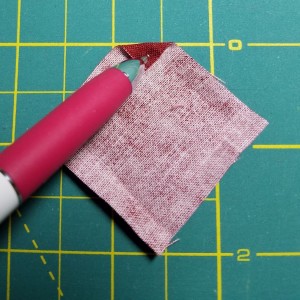
Appliqué with my original technique starts out the same – drawing the stitching lines on the right side with a chalk pencil and then finger-pressing the seams under.
Since the points are so much narrower on the diamonds, I trim the seam allowance around the sharp points as close as I dare (about 1/8 inch).
The folding is where my technique differs from the mitered corner technique. Instead of folding down the point, I fold the seam on the right side of the point under as pictured:
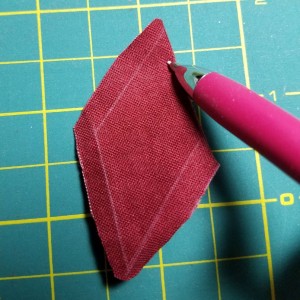
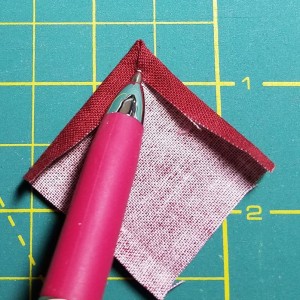
Then fold under the seam on the left side of the point, which may leave a little tab of seam allowance sticking out to the right. You can see the little tab sticking out here:
Note: if you’re left-handed, you’ll probably want to fold the left side down first. You want to have the tab sticking out on whichever side of the point you’re going to start stitching on.
Just like with the other technique, start about half an inch from the point. When you get very close to the point, remove the pin and hold the point in place with your left thumb (or your right thumb for lefties). Use your needle to stuff that tab of seam allowance underneath the point.
Then stitch up to the point, take that tiny stitch right at the point for extra security, and continue down the next side.
The “shallow” points of the diamond have much more room for seam allowance, so they are much easier to do.
While I love the new mitered corner technique for squares, I’m not as confident about it for diamonds – there’s more bulk to fit under a much narrower point. I did try out the new technique for one of the four diamonds (and no, I can’t tell you which diamond it was, because I’ve lost track of which was which).
Some of the sides of my appliquéd shapes are slightly concave – I need to work on that – but with both these techniques, the points are pretty pointy and there’s no loose, frayed seam allowance sticking out anywhere. And that’s the point.