Everyone said to appliqué the melon shapes on this block, but when I went to print out the pattern pieces, the Dear Jane software gave me templates to piece the melons to curvy background pieces, rather than appliquéing the melons to rectangular background pieces.
I was intrigued by the idea overnight, but in the cold light of morning, I decided that those pointy bits of background between the melons were just too narrow, and I’d have so much bulky seam allowance to contend with where the melon points intersected with the background points.
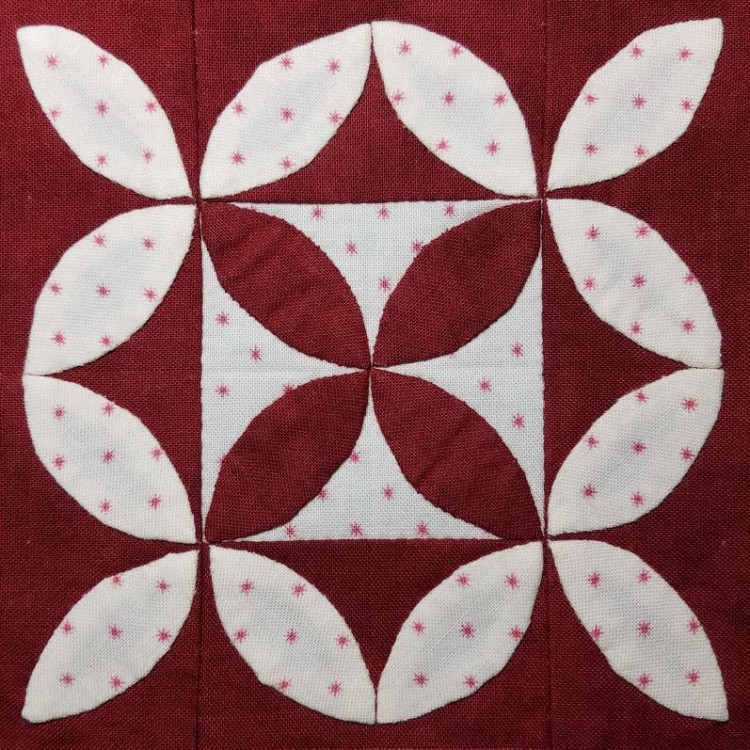
So, I went back to the original plan of appliquéing a zillion tiny melons. But how could I determine what size to make the background pieces, since the Dear Jane software was no help? Luckily, the internet came to the rescue. Several Dear Jane blogs gave the correct dimensions for those background pieces. I opted to sew the background pieces together before doing the appliqué.
There were so many intersections where multiple melon points met, and I knew that it was going to be difficult to get all those appliqués to line up properly. So, I worked out my strategy before starting.
I marked the center of the white square in the middle. For each of the center red melons, I folded under the seam allowance on one point and lined it up with the center mark, then folded the seam allowance under on the other point and pinned it at the corner of the white square.
Figuring that any pieces out of alignment would be most obvious at the spot where the four melons came together, I started stitching the first melon about 1/4″ prior to the point positioned at the center, so it would have minimal time to get shifted out of position before it was securely stitched into place. Once I stitched around the center point, I made sure the other point was still aligned with the corner of the square and stitched the rest of the way around.
The other three red melons went pretty smoothly, but the white melons were trickier to place correctly. I made sure to mark each of the spots on the red background where a melon point would go, then started pinning and stitching.
It turned out to be difficult to keep the seam allowance from the background pieces out of the way to line up the “inner” points of the white melons with the “outer” points of the red melons. When you press that seam allowance one way or the other, it shifts the top fabric slightly, along with any melons that are appliquéd to it. You can see from the photo that those melon intersections don’t look as precise as the intersection in the center of the block.
All this appliqué is pretty slow going, and at one point, I thought about just stopping four melons early:

It made for a pretty neat design, but I ultimately decided to stick with the traditional pattern, and continued on with those four corner melons.
The entire block took me nearly a month, and I feel like I’ve had enough intersecting appliqués to last me the rest of the year. Next time I’m going for a nice, simple, pieced block.