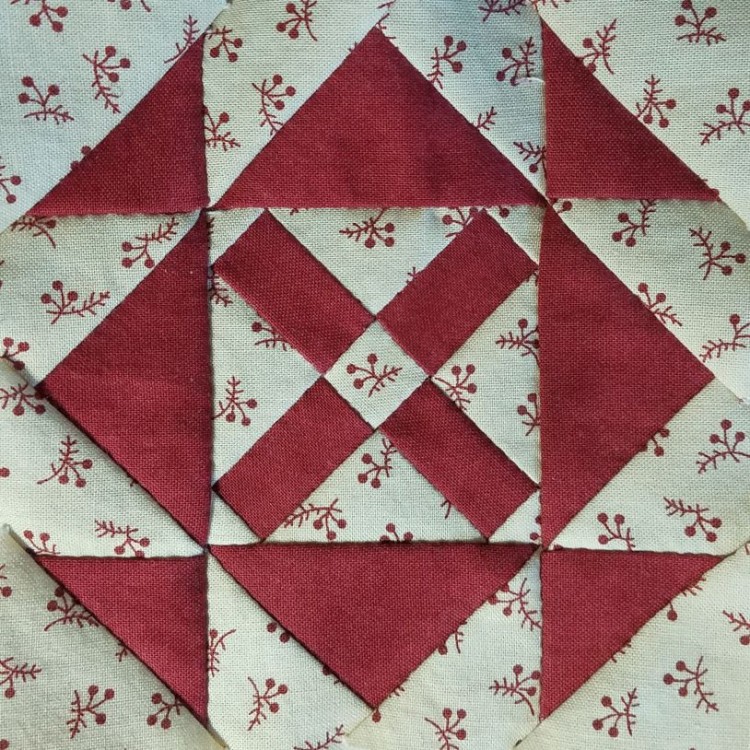
When I set out to write this blog article, I had no idea it was going to be about the undead … but from the beginning, this zombie block had other ideas.
I don’t know what it is about this fabric. I’m looking at it right now, and it’s a lovely wheat color with brick red sprigs … but the instant I take a picture of a block made with it, the fabric in the photo takes on a depressing greyish tinge. After a few other attempts on other blocks made with this fabric, I didn’t even bother trying to retake the picture of this one, because I know there’s nothing to be done about it. Rest assured that in person, the block looks much less undead.
This block seemed like a great choice for working on in July, since I seem to have made a tradition out of doing blocks with tiny triangles each July.* Those triangles at the end of each rectangle certainly qualify as tiny, so I feel like I met the annual challenge again this year.
This pattern was a fun one for me, because it’s all triangles and a few rectangles, so everything could be cut out quickly with a rotary cutter. There was no need to trace around any templates – just measure, cut, and go. As a bonus, there was no appliqué – definitely my kind of block.
Being just my kind of block, it went together very quickly, mostly at my hand quilting group. I was patting myself on the back about how well it was going.
Then it came time to iron it, and while those triangles are tiny, the seam allowances around them are not. I tried to press those seams every which way – even trying to pinwheel the seams – but to no avail.
The end result is that, despite all my best efforts to flatten the darn thing out, this block appears to be rising up in the photo … just like the undead. The tilt of the non-flat pieces gives it spooky flashlight-under-the-chin lighting, which only enhances the scary effect.
My only hope is that this zombie block made of undead fabric will not come back to haunt me.
* Yes, I know this is August, but I actually constructed this block in the first two weeks of July … and as usual, let the block languish in finished-but-not-blogged purgatory for several weeks before finally putting it out of its misery.
2020-09-09 update:
In the comments, my friend Becca challenged me to show the lumpy back of this block. I put it off for days, telling myself it was because I didn’t know how to put an image in the comments (it turns out you really can’t do that), but knowing all along that I was just embarrassed to show the back. I finally broke down and took a photo … in a relief view, like a topographic map, so you can witness firsthand the horror that is my ironing attempt:
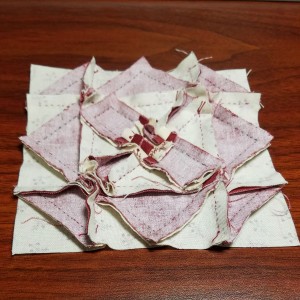
You can see that the seam intersections around that center square are all pinwheeled nicely, but it went downhill after that. Fortunately, the very act of taking the picture helped me see a better way to do it. This has happened to me with other quilting issues too … it’s like I don’t really see problems with (or solutions for) the block until I look at a photo of it. Weird.
At any rate, I went back to the drawing board (or in this case, the ironing board), and my second attempt lies much flatter:
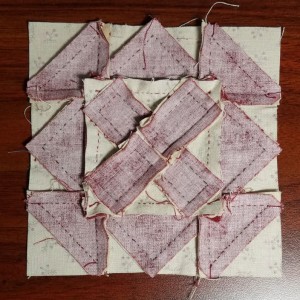
Now this is a quilt block back that I’m proud to show!
As a non quilter that block looks terrifying to me.
It looks downright sinister. I’m afraid to meet it in a dark alley. 😀
If you felt very brave, could you share a picture of the back? The ironing seems nightmarish. I’d like to see how you put it to bed.
Becca, I’m finally feeling brave enough to accept your challenge. See the update at the end of the article with photos of the original messy ironing job and the new and improved ironing job that your challenge inspired. 🙂