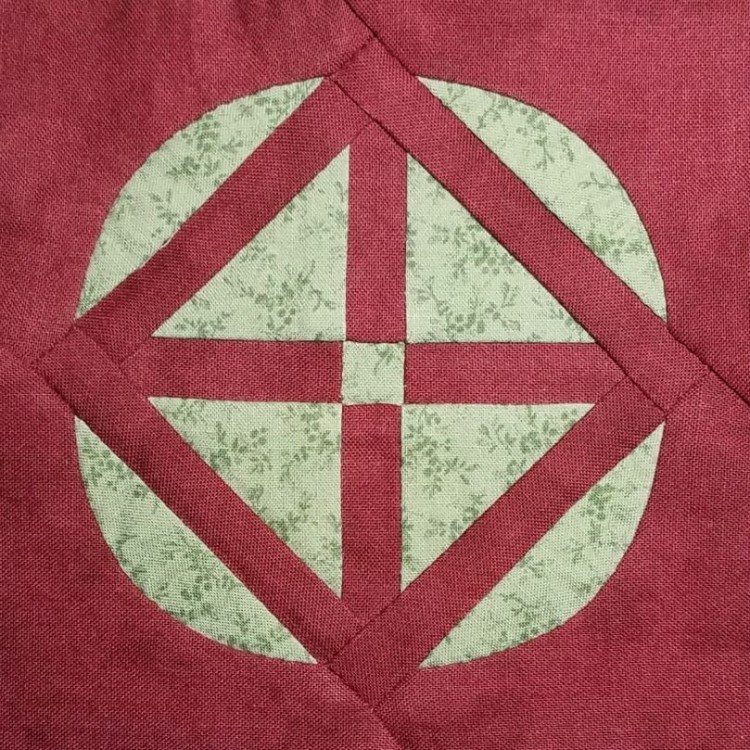
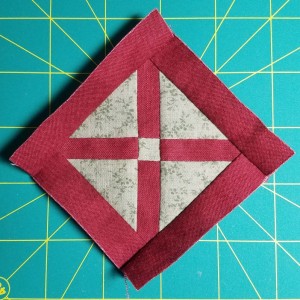
This is my block #113 out of 225 blocks. So, halfway through this block marks the halfway point of completing all the blocks. Pretty exciting stuff, right? I was so stoked to start this block. I thought to myself that the design kind of reminds me of a target sight, and I can set my sights on the second half of the quilt.
The pattern for this block in the Dear Jane software is a little different from the block design in the original quilt. In the software, the curved parts go right up to the edge of the block, which looks a little odd to me (plus I wasn’t looking forward to those little slivers of fabric where the curved seam meets the edge of the block). In addition, the strips forming a cross in the center were a lot wider in the pattern than the diagonal strips around the edges, where the original had them closer to the same size.
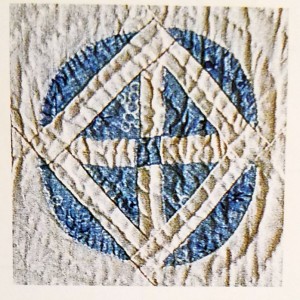
Here’s a picture of the original block:
I got the brilliant idea that I was going to redraft the pattern to be more like what was in the original Jane Stickle quilt. I saw lots of places online where other makers of this quilt had decided to do the exact same thing, and many of them even provided helpful links to their redrafted patterns … except that not a single one of the links worked. I was on my own.
The first thing I did was to change all the bars to be a fixed width of 3/8″. With seam allowances, that meant cutting strips that are 7/8″ wide. Here is a list of strips to cut that might help other quilters foolhardy enough to try redrafting this block:
- one 7/8″ x 7/8″ square of green for the center squares
- four 7/8″ x 2″ strips in red for the vertical and horizontal bars
- one 7/8″ x 2 3/4″ strip, two 7/8″ x 3 1/8″ strips, and one 7/8″ x 3 1/2″ strip, all in red for the diagonal bars
After some quick calculations, I decided that I needed to cut two 2 1/8″ squares in green and cut each in half diagonally to make a total of four half square triangles. They might be slightly off, but I would make sure everything lined up at the center when I sewed them to the red strips and center green square; then I could trim off any excess at the edges.
You can see it’s not perfectly square at first:
I cut the red strips a little longer and without the points at the end, and wasn’t sure the green triangles were going to be exactly right, but I knew I wanted to end up with a square that was about 2 5/16″ across (2 13/16″ with seam allowances). So after assembling this center section, I flipped the block over, drew the proper stitching lines around the edges of the pieces, and trimmed off the extra bits:
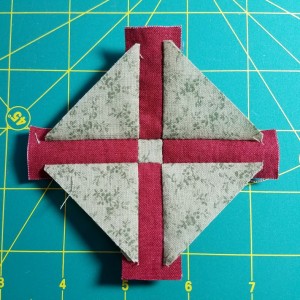
Then it was a simple task to sew the red strips around the edge that would become the diagonal bars in the finished block. At this point, I had sewed together 13 of the 21 pieces, and congratulated myself on making it to the halfway point of the halfway point. (For historical recording purposes, I’ll tell you that it was Sept. 19, 2020 at 4:09 PM Pacific time). Here it is in all its glorious half-finishedness:
I rested on my laurels for an unspecified amount of time and then figured I’d better figure out the other half of the block. First, I determined the size of the red triangles that would go in the corners of the block (what the green curved pieces would attach to). For those that are following my cutting list, you will need to cut two 3 1/4″ squares in red and cut each in half diagonally to make a total of four half square triangles.
The green curved pieces were uncharted territory. I knew I wanted them to be a little farther away from the edges of the block (more like the original design), but wasn’t sure how best to achieve that. I wish I could say I did something fancy and scientific, but here’s what actually happened. I decided I wanted the finished length of the curved pieces to be 2 1/8″ (so about 7/8″ less than the diagonal bars they were attached to). I decided I wanted the widest part of the curve to stick out about 1/2″ from the diagonal bar because it looked reasonably nice. That was my scientific reasoning.
On the curved pattern piece I’d printed out from the software, I measured in 7/16″ (half of 7/8″) and made a pencil dot on each side of the long straight stitching line. Then I found the center of the pattern piece and made another dot 1/2″ out from the long straight stitching line. Then I freehand drew a curve between these three dots (even now I cringe at the lack of precision). Finally, I had to add a seam allowance. I measured out 1/4″ from the stitching line and added pencil dots at regular intervals, then freehand drew a cutting line connecting all those dots. So, I have no helpful template to give you here, but hopefully my description of my process will help you determine your own.
Next I needed to figure out how I was going to attach the green curved pieces to the red triangles (no thinking ahead for me!). I was not really excited about appliqué, but it seemed like the easiest course of action. The problem is that if I appliquéd the green onto the red, it would sit on top of the red and look like it was appliquéd on. And reverse appliquéing the red onto the green seemed problematic as well, since it would be so awkward to appliqué the big red piece onto the tiny green piece.
Ultimately, I decided I was going to skip the appliqué altogether and use curved piecing instead. I prepared the red triangles for curved piecing by the very scientific method of cutting off the seam allowance of my freehand-drawn pattern piece, holding it in approximately the right place on each red triangle, and tracing the stitching line onto the red triangle. Then I measured 1/4″ away from the stitching line (towards the long side of the triangle), making pencil dots that would become my cutting line.
Now I had all eight curved pieces that I needed in order to complete the block. At our October hand quilting group meeting, I braced myself to start piecing those curves. I clipped into the seam allowance on the concave red piece, and pinned the green convex piece to it. I stitched the seam once, and it was terrible. I pulled out the seam and tried stitching it a second time. It clearly wasn’t going to come out anywhere near the right shape. I abandoned it and worked on a different project for the rest of the meeting.
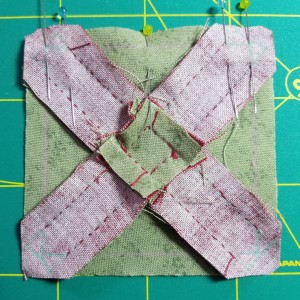
At this point it had been about three weeks since I reached the halfway point of the halfway point, and I was starting to fear I might never go beyond that point. In the 4.5 years I’ve been working on this project, I’ve never gone a month without finishing a block, but the end of October was fast approaching. So, after the block had spent another two weeks in timeout, I started ripping out that seam for the second time:
The timeout must have done me some good, though, because this time I figured out where I’d been going wrong. I’d broken a cardinal rule of curved piecing: the concave piece always goes on top. I don’t know what I was thinking; maybe that the green convex piece was smaller so it made more sense for it to be on top? At any rate, as soon as I put the concave red piece on top while stitching the seams, it was smooth sailing. That first curved seam that I had to rip out so many times still doesn’t lie quite right (see if you can guess which one it is), but the other three look great and I’m calling it good enough. Lesson learned.
Once those pesky curves were done, I raced against time to sew the four corner triangles on to the center square in the final hours of October 31st:

I’m pleased to have moved past the halfway point at last … and just in time to keep my at-least-one-block-a-month streak alive. Now I’m looking forward to the second half.
There are 3 sites that I keep up on my computer when working on mine. Yours, Susandgatewood.net and thatquilt.blogspot.com. I love yours for the detail and the fun of reading!! Keep up the good work, it is looking wonderful. Dawne
Oh my goodness, Dawne, you are putting me in such good company! The “That Quilt” blog is my go-to resource for construction advice, and although I’m not paper piecing my quilt, I usually check out Susan Gatewood’s version of each block too. Thank you so much for the kind words!