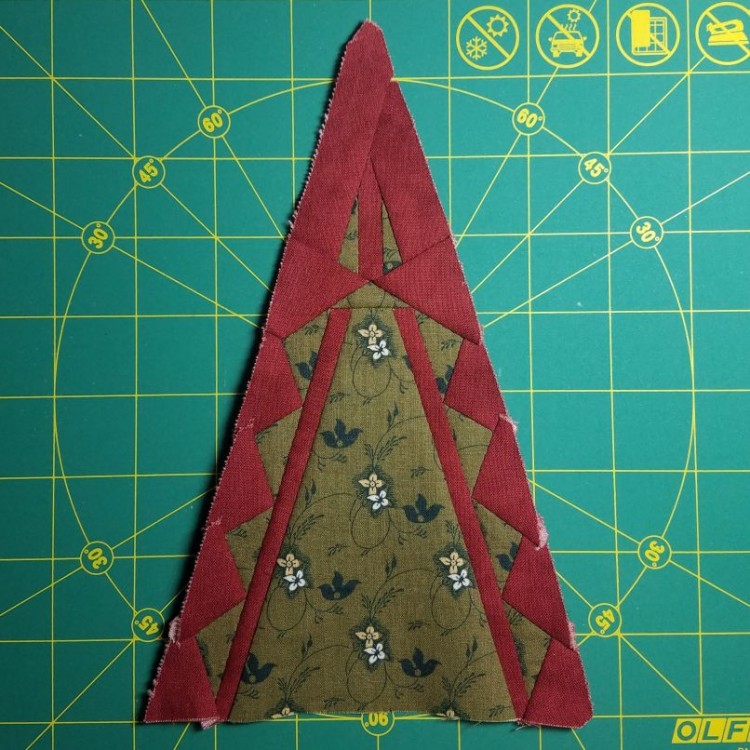
To me, this block definitely looks like a hood ornament on a big 1970s car. Once upon a time I owned one of those big 70s cars, complete with hood ornament, but these days, there’s just no place for a car like that: it guzzles gas, it’s really hard to park … and sometimes I feel the same way about this behemoth of a quilt.
While I was working on this block, my friend Janet asked if I was going to hand quilt this project, and I said I definitely was because I don’t like machine quilting, plus it was far too big to fit comfortably under the machine. Which led to the question of how big the quilt was going to be, and I automatically answered 108″ square.
And then I realized that 108″ is 9 feet, and I got a little freaked out by that. (Note: I realized later that I had it wrong, and the quilt is actually 84″, which is 7 feet square. Not quite as daunting, but still quite big.)
Which is when it occurred to me that in the 5.5 years I’d been working on this project, I’d never once given a thought to what I would do with the finished quilt.
I’m definitely a process-oriented person when it comes to quilting, enjoying the journey as much as the finished product, but it’s kind of weird to never have considered it at all. Our bed is not that large, plus I’m not sure how I feel about using the “masterpiece” as a bedspread. And our ceilings are just about 7 feet tall, so it’s not like I can display it on a wall.
I hope it won’t just be relegated to a closet somewhere. I’ll have to put some thought into it … and I have plenty of time to think during the long hours working on this quilt.
One finished product that I hope will come out of the project is this blog – a resource where I can pass on my lessons learned to other quilters attempting a Dear Jane quilt.
And this block did afford some lessons to learn. The piece templates offered by the Dear Jane software for the top of the triangle implied that you would be appliquéing three layers thick at one point, and I was not enthusiastic about that.
And then when I went to look at the photo of the original block, I realized that this triple-layer way of piecing the triangle top didn’t even match what Jane had done on the original. So, I foolishly attempted redrafting yet another block.
Basically I added a couple of seams in the red background of that top section of the triangle, so that no appliqué was necessary:
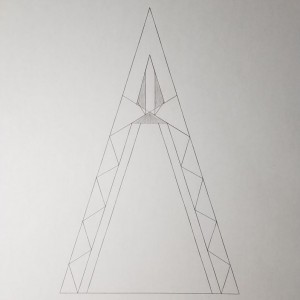
It’s not often that I add more seams to a block, but here it made all the difference. Now I could piece those skinny green antennae on the hood ornament, inset them into a V-shaped red piece at the top, and then attach two red triangles to the sides to finish out the top section.
Of course, you can see from the final block photo that my original plan of insetting into a V-shaped red piece at the top did not work out. The angle of the V was so narrow that it just wasn’t feasible, so I ended up using two separate strips to form the V at the top.
No appliqué required, and no set-in seams either, thanks to my second pattern modification. Not too bad for a day’s work.
I traced the outlines of the new pieces onto a partial Avery label sheet, stuck the labels to the fabric and cut them out with seam allowance added, and then just continued on as usual with the block assembly.
If that helps any quilters tackle this block, then I’ll consider my project useful, even if I don’t know what to do with the final result.