This is the 40th block I’ve completed on this project, and I feel like my actual fortieth birthday was less of a momentous milestone than the quilt block. Forty appears to be the magic number of blocks, the tipping point, where my Ziploc bag of completed blocks is too big to fit in my purse. I’d been carrying them all around with me, just in case someone wanted to admire my work, but there’s just getting to be too many of them.
On the bright side, now I don’t have to worry about purse snatchers making off with years’ worth of my work (because really, I can’t imagine purse snatchers appreciating hand-pieced quilt blocks that much … they’d probably just throw them away).
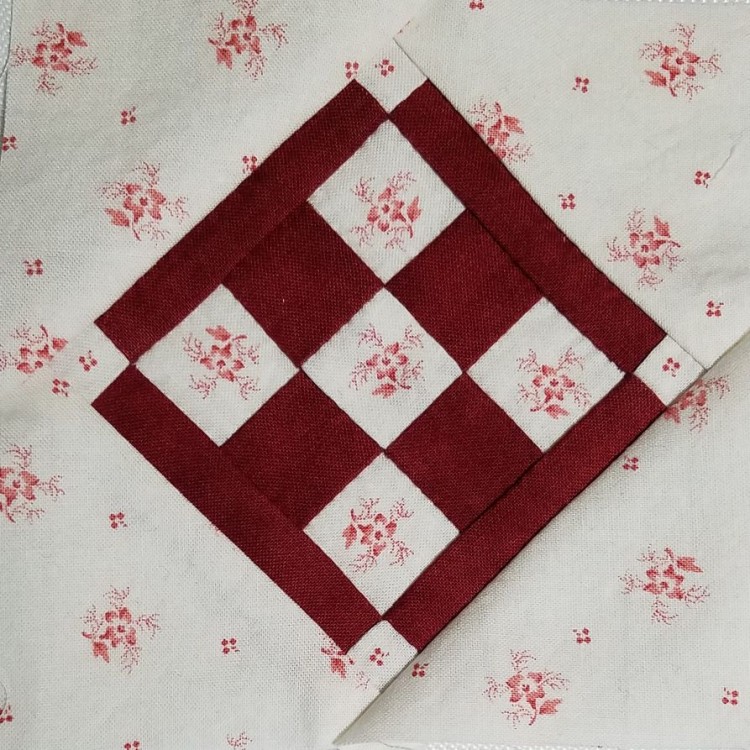
It was just coincidence that this was the fortieth block, but it promised to be one of the toughest blocks yet. For starters, it was a rematch of the Alien block I did fairly early on, which had a nine-patch diamond set in a square, and would not lie flat for love or money. The center diamond insisted on sticking out from the rest of the block, like an alien trying to burst out of someone’s chest.
I did that block over a year ago, though, so I hoped that the skills gained in the meantime would mean this block would be more successful. Overall, I think it lies flatter. I pressed in a different direction, so if anything, the center diamond looks like it’s sinking in, rather than popping out. It’s still got a little bit of that 3D op art look to it though.
The second toughness aspect was the size of those tiny squares in the border around the center diamond. Those are my smallest pieces yet – 3/8″ across. There’s far more seam allowance than there is visible fabric. I started out fussy-cutting flowers for those tiny squares, just like I did for the squares in the nine-patch, but I quickly realized the squares were too small. You’d see so little of the flower that it’d just look like smudged red fabric. So, I re-fussy-cut them using the much smaller clover motif.
I was excited about cutting the rest of this block out, because it looked like it could all be done with rotary cutting, which is math-based and (in my experience) far more accurate than tracing around pattern pieces and cutting them out. However, when I looked up the rotary cutting instructions for this block, those large triangles in the corners weren’t included in the rotary cutting instructions. Two of them were shown as triangles with the points cut off, which necessitated using a pattern piece.
I’m not sure why they did this; my best guess is that they wanted to reduce the bulk of the seam allowance where those triangle points meet, right next to those super tiny squares. I decided if that was the case, it would be more important to reduce that bulk for machine sewing than for hand sewing, so I was going to rotary cut them anyways.
Armed with my new knowledge about bias, I knew that this called for half-square triangles, so there wouldn’t be any bias edges on the edge of the block. I measured one of the short sides of the pattern piece to determine what size to cut my two squares, then cut them in half diagonally to make the four corner triangles.
It’s possible that the extra bulk from this rotary cutting method is contributing to the 3D op art effect on the finished block … so I may trim some of the extra seam allowance later. For now, though, I think it’s good enough that I’ll let people admire it.
Since I can’t show the blocks off in person to random strangers any more, maybe I should make up business cards with my blog address on them to hand out to people. If you see me on the street, I won’t be able to whip a giant stack of quilt blocks out of my purse for you to look at, but I can hand you a business card showing you how to visit my blog and subscribe at the bottom of any page. Then you can be notified via email whenever it’s time to virtually admire my latest block.