I know what you’re thinking: what does the bowling term “pinsetter” have to do with this quilting block? I did actually sew part of it while waiting for my bowling league to start last week … but that’s not the only connection. I also used this block to try out a new pinning technique (where you “set” the pins in place on the fabric … get it?).
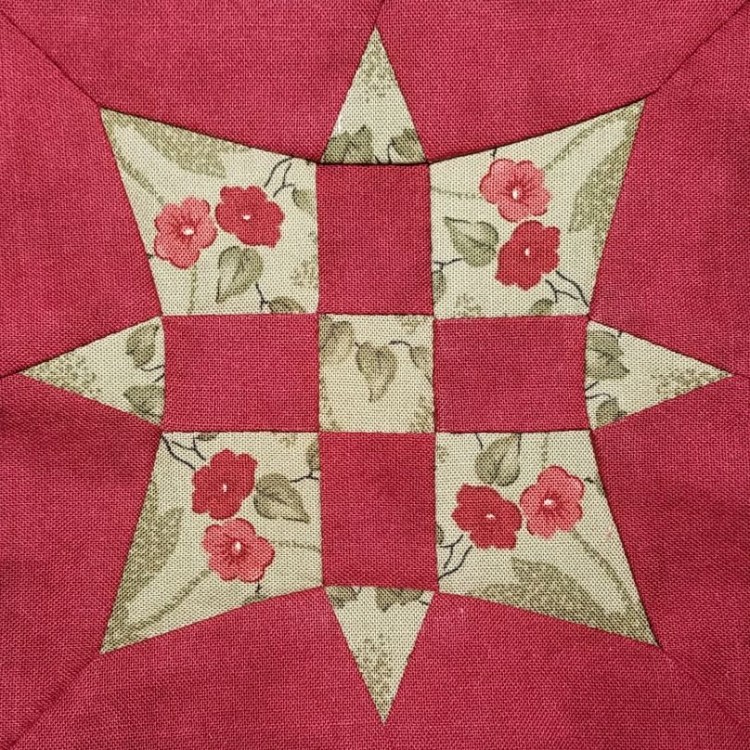
It took me quite a while to get going on this block. I was not ready to face another round of that red leaf fabric again, so I picked another fabric that I’m planning to use several times on this quilt instead. This floral fabric is not quite as small-scale as I would normally choose for blocks of this size, but the colors were perfect, so I continue to use it. The bigger problem with it is the odd distribution of flowers on the fabric: mostly red blooms with a few white ones thrown in.
Just like with the red leaf fabric, I learned from my previous experience with this particular print. Last time I used this floral fabric, I cut randomly and ended up with bits of white flowers on only two of the many pieces of the block (and those two pieces were right next to each other). It looks lopsided and has bothered me ever since (although not quite enough for me to remake the block). This time, I fussy cut to get just the pattern I wanted on each piece: a double red flower motif in each of the kite shapes, and only leaves in the other floral fabric pieces.
Because of all the odd-shaped pieces in this block, stitching everything together accurately was very important. I decided this would be a good time to try out a new pinning technique I’d read about, which promised to allow for more precise alignment of the pieces.
When you’re matching up two intersecting seams, conventional wisdom says to put a pin right down through the seam on the marked stitching line on the first piece, then right down through the line on the seam on the second piece. Then you push the pin back up through the layers a short distance from where it went down through the layers, to secure the pin in place.
The theory underpinning (pun totally intended) this new technique is that if you pin in the traditional way, putting the pin right where you want to stitch the seam, and then pushing the pin back up through the layers, this would cause the fabric to shift slightly so that the layers would no longer be precisely aligned.
The new technique recommends a three-step pinning process. First you put the pin in through both pieces and push the pin head all the way down to the surface of the fabric, without pushing back up through the layers, like this:
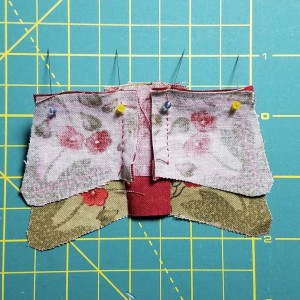
I tried to position the two pieces so you could see the pointy ends of the pins sticking out the back in the photo.
Next, you insert a second pin close to the first pin, going down and back up through both layers, like this:
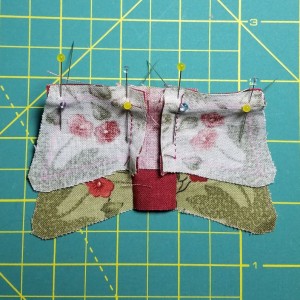
On the far left, you can see that the blue pin is still sticking out the back, and the yellow pin right above it goes down through all layers and comes back out the front right below the blue pin head.
For the final step in the process, you remove the first pin, leaving only the second pin you inserted right next to it, like this:
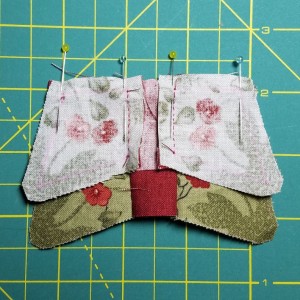
The idea is that the initial pin, pushed all the way down to the head, but not back up again, will hold everything in place without shifting, until you can get the “permanent” pin stuck in place to hold everything while you stitch.
It seemed like a great theory, with the added bonus that there wouldn’t be a pin in the way as you were stitching across those aligned seams. In practice, however, it did not work out at all. It shifted far more than my traditional method. I ended up having to redo the one seam I tried to do the new way.
It’s possible I’m just not doing it right, but I can’t figure out how I could have done it wrong. So, I think I’ll put a pin in this new technique, and go back to my original one-step pinning method for the time being. Sure, you have to remove the pin and hold things in place with your fingers as you approach the seam, but in my case, anyways, my fingers were holding things in place much better than that second pin did.
I’m very pleased with how the block came out, pinned the old-fashioned way.