I finished this block yesterday, on May the 4th, so as I was wrapping it up, I naturally spent a lot of time thinking about Star Wars and the power of the Force, which would have come in really handy during the construction of this one.
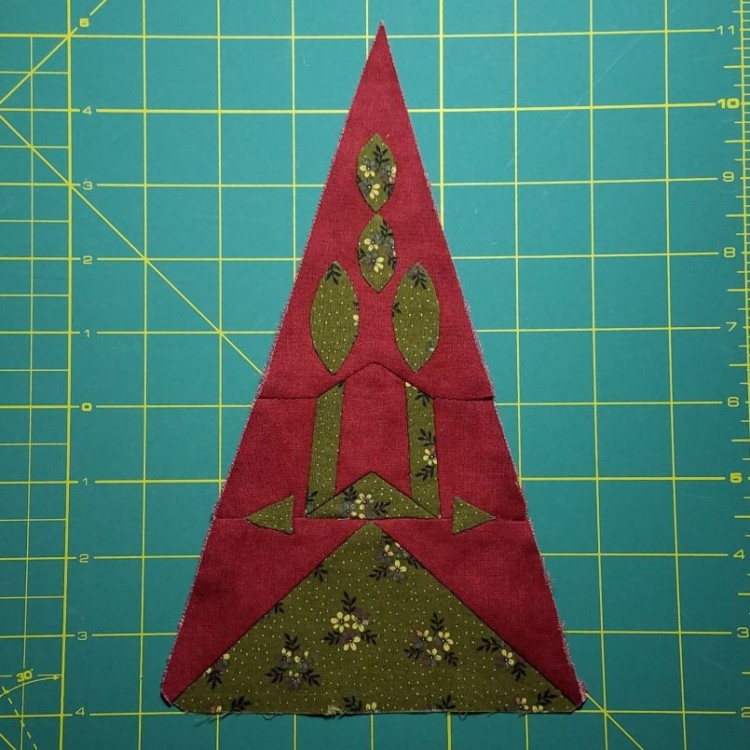
When I started this ill-fated block last month, I knew it was going to be tough. It had weird shapes, inset seams, and tiny appliqué pieces that were stitched over seams… all in the most frustrating block shape of all: the triangle.
The first thing I noticed about the pattern is that they had thrown in an extra seam near the top of the triangle, which didn’t even serve the purpose of eliminating an inset seam (although I guess it technically eliminated one bend of an inset seam). To add insult to injury, this extra seam had a melon partially appliquéd over it. Doing appliqué over a seam is a big hassle, because you have to keep all that seam allowance moved away from the area where you are currently taking a stitch.
So, I opted for the lesser of two evils, and changed the pattern to eliminate that seam. It meant one more inset seam bend, but one less seam to avoid appliquéing through.
You may remember that I’ve been printing out the pattern pieces for these triangle blocks on full-page Avery labels, kind of like freezer paper templates, but without the pesky need to iron the templates on to the fabric. This is a great method, but the Avery labels are rectangular, and the blocks are triangular, which makes for a lot of wasted label paper:
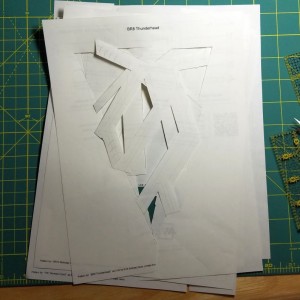
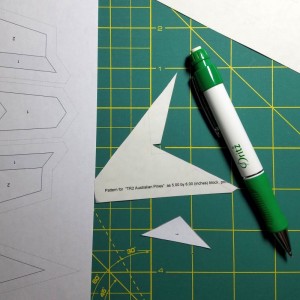
The pile above is from printing out the pieces for four previous triangle blocks. You can see that there’s a lot of unused label there … and those label pages aren’t cheap. In an effort to not be wasteful, I opted to print out the pattern pieces for this block on regular paper, cut them out, and then trace them on to my scraps of leftover label paper:
This two-step process takes a little more time, of course, but it’s making me feel very thrifty.
I cut out all the pieces, stitched two of them together, and then got nothing else done for the rest of the week. That Saturday, I packed up the rest of the pieces and headed off to my hand quilting group, determined to make progress on this block. The very next piece I sewed on, I had to redo because I had somehow gotten the seam allowance of the first piece stuck in the seam.
Not wanting to redo the entire long seam (it’s one of those along the bottom green triangle), I opted to just clip the knot off right next to where the seam allowance had gotten stuck, and then restitch only up to the first backstitch on my original seam.
A lively discussion ensued among the group members about whether backstitches were enough to secure a seam, or whether a knot is required to keep the stitches from unraveling. I’ve always firmly been in the knot camp, and I’m still not sure I’m convinced about using backstitches in place of knots, but I guess this seam will be my test of that theory.
After the debacle of that first seam, I made great progress for the next couple of hours. When it came time to start the appliqué, however, I realized that I hadn’t brought any green thread with me, so I had to work on other projects instead. Nothing about this block has gone as planned.
Once I got home, I started appliquéing the green melons on that red piece at the point of the triangle, which I had cleverly cut larger than called for. My plan was to add the melons, then stick the Avery label for this piece on the back of the fabric (using the appliqué stitches on the back as a guide, to make sure all the melons fit within the finished size of the red triangle point), and then trim the red piece to the right size.
The melons do all fit in the allotted space the way I trimmed it, but I realized later that the two larger melons are supposed to be much closer to the green strips than they actually are on my triangle.
Also, for the first time, I noticed that I should have been more careful to fussy cut when I was cutting out the various green pieces – half the melons have lots of flowers, and half have almost none; only one of the skinny strips has flowers. I feel like from a motif perspective, the end product is a little lopsided. I’m pretty sure this block is cursed.
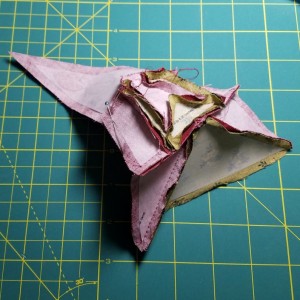
Forging on, I attached that odd-shaped triangle point with the melons on to the rest of the block. With that little jog up and back down in the middle of the seam, it was a challenge to keep everything in the right place while stitching. During this phase, it looked more like origami than anything else:
The last step of this block was to appliqué those teensy green triangles. I knew these were going to be super tough, between stuffing one seam allowance underneath the tiny triangle and keeping the other seam allowance out of the way while I did it.
The first one went terribly, but I was still on the fence about whether to call it good enough. I did the second triangle, which came out much better … so I ended up ripping out and redoing the first triangle to try to get it closer to the other one. I’m still not that happy with my second attempt, but it’s somewhat less bad, and I’ve had enough of this wretched block.
I definitely could have used the Force at several points during the construction of this block, including mysteriously shifting seam allowances, that fabric-bending inset seam, and the near-impossible tiny appliquéd triangles. Now if you’ll excuse me, I need to see if Yoda has written any quilting books I can buy …