My faithful readers (all 17 of them!) may remember that I switched around the fabrics I planned to use for certain blocks earlier this year, in order to accommodate a new fabric I’d found. This block is the other one I switched as part of that process.
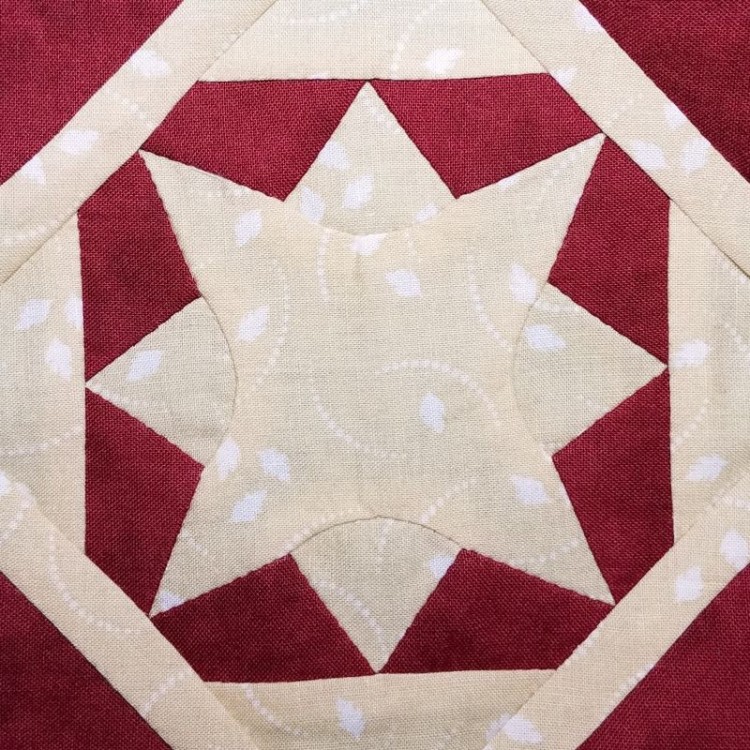
I was quite excited to not use that weird faded palm leaf fabric anymore, and I thought this swirling leaves print would be a great fabric to use for this block instead, since the block design evokes the swirling motion of a whirligig.
The general consensus online was to use appliqué for this block (either make the center star one big piece of appliqué, or appliqué two “four-pointed stars” one on top of the other). I was appliquéd out, so neither of these options appealed to me. I decided to go for curved piecing instead.
My normal routine for constructing a block is to spend a little bit of time planning my approach to the block, then spend some time cutting out all the pieces, then spend some time marking all the pieces, and only start the stitching after all those processes are complete.
This block was different, because I’d decided to participate in the #monthofstitches challenge from mid-April to mid-May. The challenge was to take at least one stitch on a hand stitching project every day for a month. The theory is that once you sat down to take that one stitch, you would take a bunch more, and be magically productive on your handwork projects, one stitch at a time.
But as we’ve already established, that’s not the way I work. Normally I’m only taking stitches for about a third of the days I work on a block. The rest is spent on planning, cutting, marking … and afterwards, photographing and blogging.
Luckily, I had some other handwork projects to fill in with – here is a photo of the various hand stitching projects I worked on during the month:
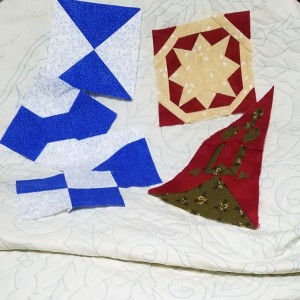
In the background is my ongoing wholecloth quilt project. I did a few motifs over the course of the month, but it was not a great choice for just getting in a few stitches. By the time you get it in the hoop and ready to go, you want to finish at least one motif, so you’re committed to close to an hour of work in one sitting.
On the left are some sample blocks I made for a hand piecing class I’m teaching this weekend. I feel like the challenge really helped me overcome my procrastination on making these, and it was good I tried out each of them ahead of time, because I uncovered some issues with the drunkard’s path block and ended up using a different pattern for that one.
On the right are my two (yes, only two) Dear Jane blocks for the month. I was beating myself up about not making my goal of 2.5 blocks per month (30 per year) this month, but I actually made 4 extra blocks this month for the class, so it’s not like the productivity was totally wasted.
Not pictured is a little fuzzy snuggle pillow I hand stitched for my kid to take to a robotics competition in Houston last month. I never did get a photo of it, and it accidentally got left behind in the hotel room … but the pillow served its comforting purpose, and it definitely still counts for the challenge.
On the surface, the challenge was a success, but how was it for my Dear Jane project? I’m not sure it was really ideal. Despite the other fill-in projects, I still had a lot of days to fill with a whirlwind of stitches.
Instead of cutting out all the pieces for a block at once, I ended up cutting out a couple per day, marking them, and then immediately stitching them together. On many days, I found myself stopping early – taking almost literally one stitch – and then “saving” the rest of the seam for the next day.
The challenge did get me stitching every day, but I’m not sure the overall number of stitches really increased. The real goal of the challenge was to actually stitch more, not just to more evenly distribute the stitches throughout the month.
The construction process felt more fractured to me, and when I sat down to blog about how I put this block together, I had to really think about it. I don’t have any photos of the block in progress either, as it never seemed to be in a state where it made sense to take a picture. So, here’s the (photo-free) capsule version of the assembly process, but know that it was definitely not done in an orderly assembly-line-style process like I usually do.
First, I sewed two red parallelograms on to each of the tan wedge pieces. Then I sewed a tan strip on to each of those units (thinking it would be easier to attach a narrow strip to a smaller unit, rather than sewing it on to an almost-completed block).
Next, each of those units was sewn on to the center four-pointed star piece – definitely the trickiest seams of the block. The curved seams where the wedge is attached were so tiny, it felt like I was trying to sew doll’s clothes.
The final step was to sew tan strips on to the red corner triangles (on the same theory about attaching narrow strips to smaller pieces), then sewing each of those corner units on to the block.
This block was a whirlwind in every sense of the word: the whirligig block pattern and the swirling leaves fabric make the block look like a whirlwind; plus the #monthofstitches challenge made the construction process feel like a whirlwind of constant activity.
Here’s hoping the next block is just a gentle breeze.