
At the end of April, I was so far ahead of my self-imposed schedule (I’d already finished my “May” quilting goals), that I decided it was time to tackle this super-complicated block.
It’s right up there with G6 as far as general block dread goes. It’s a triangle block, and it has complicated piecing, and it has multiple places where a piece of the print fabric is adjacent to another piece of print fabric, making one’s fabric choice potentially add an extra layer of complexity.
I pulled out the fabric I’d originally picked for it, with floral sprigs spaced about an inch apart, with little stars in between them. But I just couldn’t get excited about it.
In fact, I’m so unexcited about this fabric that I’ve only used it one other time, on a block I was so unexcited about that it didn’t even get its own blog article. But you can see it in the top left of the photo in this article, if you’re super interested in knowing which fabrics don’t interest me.
I looked at all the usual blog sites to see what my fellow Dear Jane stitchers were doing for this tricky triangle block, and noticed a surprising number of folks using checks or other non-random patterns. Jane herself used a plaid.
And then I got the insanity-inspiring idea that I should use a striped fabric for this block. The idea was that I could orient the stripes in such a way that they were (purposely) not running in the same direction as they were on adjacent pieces, so there wouldn’t be any weird mismatched-when-they-should-be-matched stripes.
I drew stripes on a block outline, and decided that I liked my plan for stripe placement:

Now I just had to figure out how to assemble the darn thing. Some parts of the block were obvious: the three triangles and the strip at the bottom were all pieced. The three diamonds at the top were clearly appliquéd.
That circle in the middle, however, was a complete mystery. Some folks pieced a pinwheel block, then appliquéd the melons to it, then reverse appliquéd the whole unit into the triangle.
But that seemed like it wasn’t ideal for hand stitching, and also would add a lot of bulk. So, I decided I would appliqué the striped diamonds in the center of the circle, leaving the red background of the triangle block to represent the solid red parts of the pinwheel. Then I would appliqué the melons in place, also on top of the red background, and be done with it.
In theory, this shouldn’t have been a big deal, but it was a little unclear where the melons would overlap the diamonds, and if I appliquéd the part of the diamonds that were hidden behind the melons, it would be too bulky where the melon and diamond points came together.
So, in typical me fashion, I had to drag my feet for days while I stressed out about how this would work, instead of just starting to stitch and see what happened.
Eventually, I forced myself to just start, appliquéing one of the diamonds on the background, starting at one of the less pointy points, stitching up to the top of the piece, and then back down to the other less pointy point.
The theory was that the melon would overlap to about this point, so it was a good stopping place, eliminating some of the bulk underneath the less pointy points.
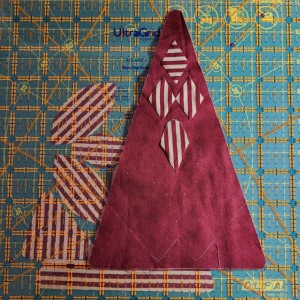
At this point, I gave the block a 40% chance of success, at best.
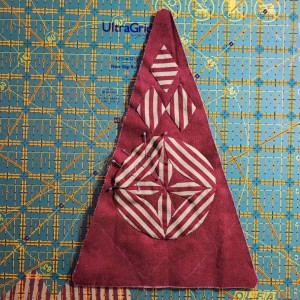
You will see that all my “in progress” pictures show the triangle on top of a ruler holding the rest of the pieces in place on the cutting mat, since precision really counted on these and I didn’t want any of the pieces to blow off the mat and get mixed up.
After I had that one diamond stitched in place, I prepped one of the melons and pinned it in place, so I could see if I was correct about where it would overlap the diamonds in the center …
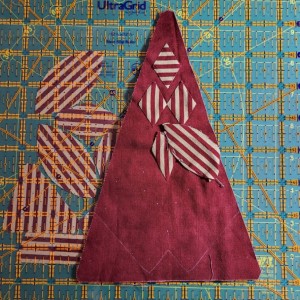
Once it was pinned in place, my confidence went up slightly, but the chances of success were still firmly under 50%.
I half-stitched the rest of the diamonds, and they looked pretty good. For the first time, I felt that this might actually work. Chances of success: 55%.
The first melon felt awkward to stitch on, with the outer points of those diamonds able to flop around freely while I was trying to hold everything in place. The chances remained at 55% for this first melon, but started to creep up as I worked on appliquéing the other melons.
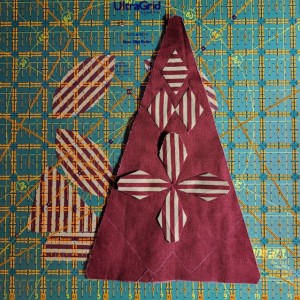
By the time I went to pin the fourth melon in place, the chances had risen to 80%, but they plunged back down to 65% when the fourth melon was pinned:
The second and third melons looked great, with the stripes of the melons dovetailing beautifully with the stripes of the diamonds, and the fourth melon looked to be following suit.
But that first melon was way off. The stripes didn’t line up, it felt like the melon was pulling the top diamond out of alignment, and I had a sneaking suspicion that the first melon was bigger than the other three.
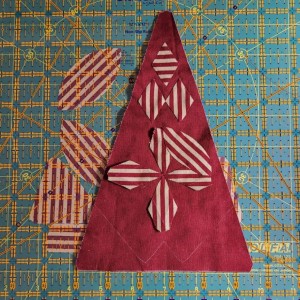
I hated to redo any appliqué, but that top right melon was really bothering me. I ended up carefully picking out the stitches on the melon, cutting out a brand new piece that was the correct size, and stitching it back on, making sure the stripes were in alignment.
Now, with all four melons appliquéd and that center circle looking so awesome, my chances of success soared to 90%. It was definitely worth the extra effort to fix it.
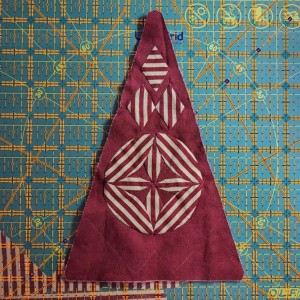
After all that tricky appliqué, the final four pieces were a piece of cake, even with the set-in seam on that center triangle.
Final chances of success? 100%, of course. Not having this super complicated block hanging over my head? Priceless.