I’ve heard this block is a beast … but I took it on anyways.
Once I’d finished using each fabric at least once, I was kind of at a loss for which blocks to do next, so I sat down and mapped out the ones I wanted to complete this year. That was three months ago, and I’ve already changed the 2019 block schedule around at least four times … I guess I needed to have a plan in order to not follow it.
The reasons for changing the schedule varied: choosing a different fabric or deciding to work on a holiday-themed block during that holiday, for example. In this case, everyone seemed to be posting on Facebook about attempting the A10 block in recent weeks, and I wanted to give it a try too. It sounded challenging, to say the least, but I hoped that it’d be one of those blocks that was miraculously easier when hand pieced.
As with all potentially-beastly blocks, I looked online to see how others were approaching it. Most people recommended appliquéing the green cone pieces (or at least the curved part of the cones), but I wanted to try good old-fashioned piecing first.
The first step was to sew the small red strips on to the center green square. The strips were cut out with rounded notches on each end for the curves of the green cones to nestle in to, rather than regular rectangular strips that would have to be trimmed later. I appreciated those notches, because it helped me properly align the cones with the center section later on.
Once those notched red strips were attached to the center, I spent a lot of time trying to figure out the best approach for the green cones and outer red pieces. Should I sew them all together in a ring and attach that to the center segment? Or should I attach the cones to the center segment and then inset each of the outer red pieces?
Ultimately I decided on an approach similar to what I’d done with the robot rabbit block. First I attached two green cones to each of two outer red pieces, making two segments that looked like red cats with green ears.
Next I sewed each of those cat ears segments on to the center segment, by sewing around the curve of one of the green cones, across the center red piece, and around the curve of the second cone. As expected, these inset seams were easier with hand piecing than machine piecing, but the curves definitely added to the difficulty.
Finally, I inset the other two outer red pieces, sewing each to the tail end of one of the other red pieces, then across the side of a green cone, then to one of the center red pieces, and back down the side of the second green cone and outer red piece.
It’s hard to describe the process with words. It was dumb of me to not take pictures, but I decided on the approach and did most of the sewing while in my quilt guild’s board meeting, and it seemed like it would be disruptive to take photos of my project while people were discussing guild business.
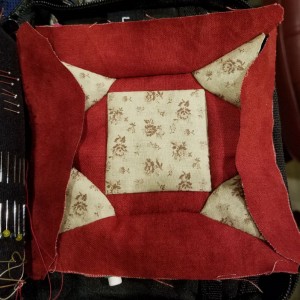
This is the only “in progress” picture I took, where I’d already attached the top and bottom cat ears segments to the center, and was just getting ready to inset the last two outer red pieces on the sides:
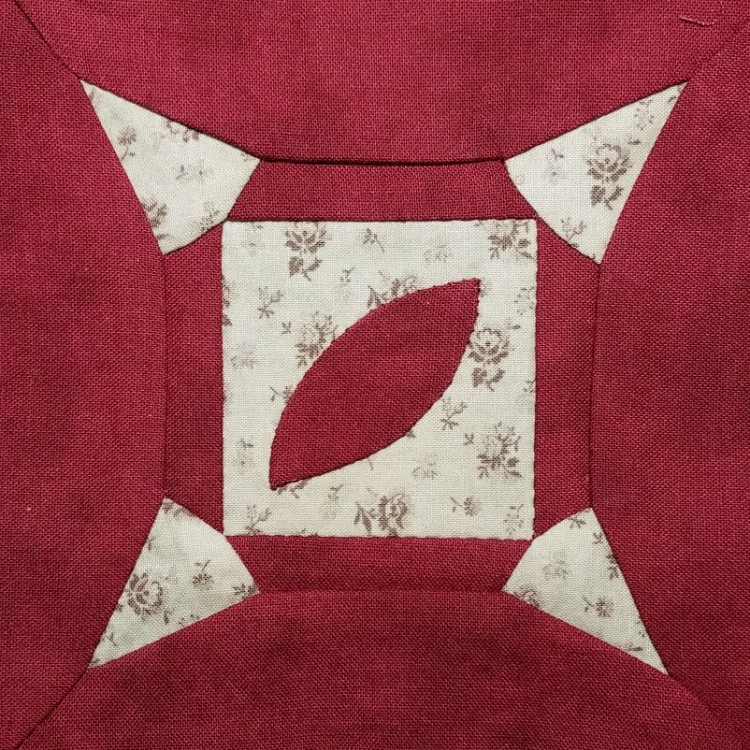
I think the finished block came out pretty decent. The rounded ends of the cones are not all quite as rounded as I’d like, but I know from past experience that if I appliquéd a curve that small, it wouldn’t be very smoothly rounded either. So, I’m calling it a win.
The last step was to appliqué on the melon in the center of the block. I used my new John James sharps needles for this appliqué, and I have to say that I think this needle made the process smoother than it would have been with a shorter needle. Even the appliqué part of this block was not as beastly as I’d feared.
The anticipation was definitely scarier than the reality here; this so-called “beast” was not that savage after all. Let’s hope that my first advanced difficulty triangle, which I’m tackling next, can also be classified as a not-so-savage block.